Wednesday, March 30, 2011

A Gnome and His Home!!


I am not a gnome in the garden kind of girl ( a pink flamingo on the sandy beach, maybe...) But everyone is loving the new movie and I really like polka dots so the cute little mushrooms appeal to me. It got me to thinking about a doing a little afternoon art camp and
A Gnome and His Home came to mind! Or A Gnome and Her Home... 
Some of the little girls wanted to make "girl gnomes."
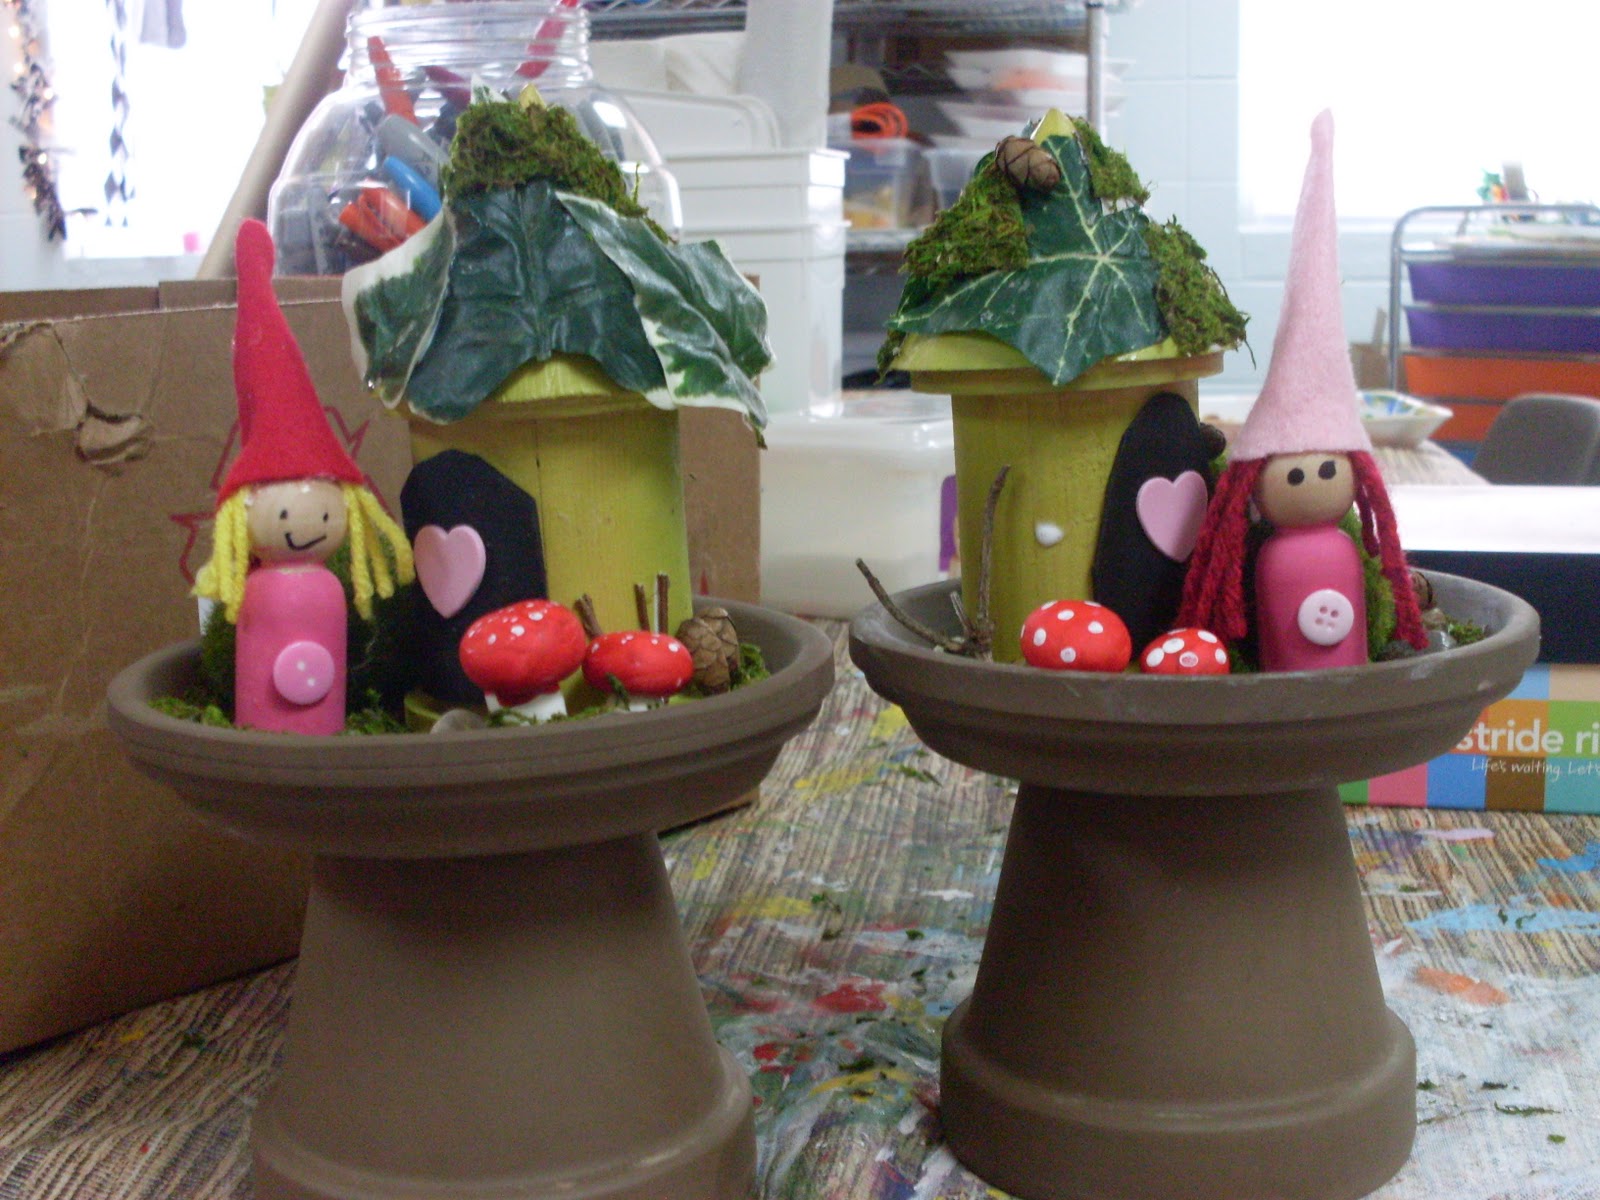
 All very cute and very easy. A fun project for a birthday party.
I glued a small saucer to a clay pot ( with Liquid Nails and let it dry 24 hours) to make a little "pedestal." My Wal Mart had these nice taupy brown clay pots and I thought they'd look nice with the moss and natural items as well as the red mushrooms and gnome hats. I purchased little birdhouses from JoAnns' for a dollar and cut off the perches. I bought the pointy top birdhouses because we thought gnomes and their pointy hats would fit better :) We used a scrap of black peel and stick fun foam to make a doorway - we placed it over the birdhouse hole and pressed it on. The gnomes are made from the little turned wooden people that come in bags of 8 at Hobby Lobby. They are less than 40 cents each. 

Then the gnome got a coat of paint and a triangle of felt for the hat. The boy gnomes got a white felt beard and girl gnomes got yarn hair. The mushrooms were made from a small amount of air dry clay. ( We used Crayola Model Magic- I love the stuff because it takes paint so well and it's easy to use and it's white !! ) We used a roll of sheet moss that I purchased for 1/2 price with a coupon at JoAnn's to line the saucer. I had a class of 14 so I needed the whole roll but Dollar Tree had small bags that would do one or two gnome homes. Then we just started gluing on twigs, itty bitty pinecones from my yard, scraps of the moss and leaves from some old silk ivy vines I had saved for crafting. We put the gnomes, their homes and some little rocks and branches in the pedestals and the Gnome and His Home was complete. They are super cute and the children loved making them and using all the natural materials - free, so they could use all they wanted. We used Tacky Glue to hold all the chunky natural materials on the houses. They could be displayed on a protected porch for Spring but wouldn't hold up out in the yard. That would require close adult supervision to use a waterproof glue.
The clay pot and saucer were less than $2.00 for both, the gnome was 40 cents, the birdhouse was $1.00. If you don't have moss around the house it is $1.00 for more than enough at dollar tree. I had the scraps of felt, yarn and fun foam. The rocks, pinecones and twigs were free. I had air dry clay but a small bag is a couple of dollars at Hobby Lobby and would be enough for a ton of mushrooms. You could use bread and a little white glue to make bread dough if you didn't want to buy Model Magic or create mushrooms from found objects. ( A champagne bottle cork looks just like a mushroom when painted but I didn't want to use those at work - for obvious reasons! )
The creative possibilities are endless and it's fun to make miniature little environments and play with them. When the children left with their finished Gnomes and Homes the adults were wishing they had come to the class!!

** Disclaimer continues... I'm still having "issues" when I try to post pictures and with spacing but at least I got something posted this try. I had more pictures to go with this post but they just wouldn't load. I'll keep trying but meanwhile please forgive the weird spacing on my posts!!

Disclaimer!!

I am sorry to say that I have been trying to catch up on my posting for 2 1/2 days now and Blogger just won't let me upload pictures - one or two will work and then I can't get anymore to add to my post!!! URG!! :(
I am trying to get help/figure it out!!
I have some cute things waiting in the wings.....

Anyone ever have this problem??? All help will be appreciated. 
I have deleted and started over, walked away and come back, growled at my computer, gone to Blogger Help... nothing has worked yet.
Is it me?? Is it Blogger??

Tuesday, March 22, 2011

Instead of Chunky Monkey it's Blocky Bunny !!?!

This guy is nothing more than a scrap block of wood - 2x4 to be exact- about 5 inches long or so. They were leftovers from a DIY project. 
I started out by hot gluing two of those little wooden "ice cream spoon" shapes on the bottom. Don't they look just like rabbit's feet? :)
Two more for arms and two more for ears. Already it looks like a bunny. 
The children painted it white.
A pink button nose, of course. I added some wire for the whiskers but they could be drawn on with Sharpies. Same with the eyes- buttons or little dots made with a marker. Cute either way. And a little white pom pom bunny tail- a must.
Someone gave me a box full of mini galvanized buckets - I love galvanized in any shape or size!! I decided we could have the bunny carry a bucket instead of a basket. We used Crayola Model Magic clay to form a carrot around a short piece of green pipe cleaner.After the carrots hardened we painted them orange and tied on scraps of fabric or netting.
This is one cute Easter guy and he cost pennies to make ( Therefore leaving more in the budget for Reese's Easter Eggs and other yummy Easter candy.)
I have a few unpainted bunnies leftover. I think I may paint the next one with polka dots.
So hop to it and make a blocky bunny!

Monday, March 21, 2011

Nothin' but sweet talk...

Just a little prop from my Sunday morning children's lesson about saying nice things!
I have made these for Valentine's day as well. (then it's a Kiss!!) 
Just cute and simple- a die cut (lips) and a lollipop stuck through the middle. I knew I was handing them out to the children so I went ahead and taped the lollipop to the lip cut out. (You could easily hand cut the lips as well.)
Just to remind us ... Nothin' but sweet talk should pass through our lips!

Saturday, March 19, 2011

A Very Hungry Caterpillar is"slinking" around here...

This little guy is "slinking" around this Spring because I was cruising through Target the other day and Slinky Jr's were in the Dollar Spot!! Yeah!! I was thinking Spring and Slinky?? What can I do??? and the classic Springtime book came to mind!! I actually bought The Very Hungry Caterpillar in a used book store years before my daughter was born -
I was in college but I thought the illustrations were wonderful.
I love Eric Carle books but who doesn't? Classic.
So here he is a little stretched out. I couldn't figure out how to stretch him out and take a picture by myself :). No one is ever around when you are trying to deal with a Slinky! He is just peel and stick fun foam and a pipe cleaner- that's it. I cut 2 peel and stick circles for each place I wanted circles on the Slinky body. I used yellow and 2 shades of green. You just sandwich a loop of the slinky between the two circles and press together. This is a little tricky for little guys but you could make one for storytime or just make them one on one if you are in a classroom setting.
Look at that face! It's just some free form shapes cut out of peel and stick foam scraps. I used a purple pipe cleaner for the antennae and then used a sliver of red peel and stick foam to hold it on to the back of the head. ( The head is two red peel and stick circles that are slightly larger than the body circles.) This is a cute Spring creature to have "slinking" around!
It is finally warm and sunny here in Atlanta after a Winter like we are not used to!! And yes, painting the peely green outside table is on my to-do list!!
A few days ago I posted about my big flower made from found objects, a Frisbee and a Dollar Tree bucket. Here is the smaller version - something each child could make. These are simply lids glued one inside the other ( great big, medium, little lesson or 1,2,3 lesson here or sort the caps by color first...) The lid "flowers" were glued to a green paintstick ( I love those paintsticks - my Sherwin Williams "connection" gives them to me!! Love SW!!) The leaves and veins are cut from Fun Foam scraps. These could also be put in little clay pots that are painted - just secure with plaster of Paris or a blob of air dry clay. If you have the can opener that makes smooth cuts you could actually use recycled tin cans. Another "budget-friendly" place to plant these flowers would be a solo plastic cup - they are at Wal Mart in the greatest Spring colors right now - lime green would be perfect!

Wednesday, March 16, 2011

Sometimes you just have to make a Peep!

Spring is Peep time - whether you want the sugary kind or a really cute Peep created from found items.
I pulled the yellow lids and tops out of my collection and gathered some pipe cleaners, google eyes, a scrap of peel and stick fun foam, a package of yellow feathers and Tacky glue.
That's all there is to it- On the larger Peep I used google eyes and on the smaller lids we just made two little dots with a Sharpie. The beak is a tiny, tiny triangle of orange fun foam. Just glue it all together and let it dry. Use a big glob of glue to hold the feathers and pipe cleaner legs onto the lid.

I decided to have the children write Peep on a small 3 inch square canvas and glue their little yellow peep onto that. 
A  hanger made from a pipe cleaner and some beads and this Peep is ready to hang around and wait to see what hatches for Spring!!  This project ( without the canvas) cost literally pennies and they are so cute! Since they are practically free you could make a family of peeps to glue to a bigger canvas or board. I also included a larger Peep made from a bigger lid in the picture which would be easier for little hands.
** I ask everyone I know to save bottle and jar lids for me. I use them for everything! Here is one of two tubs I have accumulated.
They are awesome - every color and size imaginable - and free!!!!  You'll be seeing more of these - I use them on so many projects. The children just love touching them and playing in the tub. They are a great free manipulative or sorting toy as well.

Monday, March 14, 2011

Carrots, please... not peas!

A quick and fun Spring project. We had a little after school art camp and made these cute carrot signs. Chalkboard is always a hit!
We know this one of mine isn't finished because of my lack of restraint when it comes to embellishments!! Ribbon is in this sign's future. Now, details. The board is actually repurposed. It was cut from a huge pile of bed slats that someone was throwing out - I can't imagine :)  My husband kindly hauled all of them home for me. It is 12 inches long and about 3 inches wide. A little orange paint and we are on our way.
For the "green part" I glued on what I call ice cream spoons. They are actually little wooden shapes that you can buy by the bag full at Hobby Lobby for about $1.99 for 50. They remind me of the spoons you got from the Good Humor man when you bought ice cream in the summer when I was little. We painted those a bright green.
Sorry for the blur!! I cut a piece of peel and stick chalkboard paper ( Love this stuff- it's at Michael's- use your coupon!!)  We put that in the center and then we all had a blast writing our names or Happy Easter on it. We added the wire and beads and it's  ready to hang on the door.