Wednesday, November 30, 2011

Charlie Brown Christmas!!

Tonight at church the kiddos watched the Charlie Brown Christmas special - sweet message by Linus at the end- and then we made Charlie Brown Christmas trees. This is such an easy project and it costs next to nothing if you are looking for a project for a lot of children this Christmas season. I did this with College Girl's classmates when they were in
 elementary school. This project goes way back with us :)

You need some type of clay or playdough to hold the tree upright. I used this because it was leftover from another project. Use whatever is cheapest- it doesn't show. It's just a way to hold the tree in place. The tree is a scraggly clipping from the Christmas tree lot. They will give these to you.

You simply put a blob of clay in the center of a small paper plate ( this one is a dessert size for reference) or a square of cardboard and stick the clipping in. I bought the small red plastic ornaments and wire ornament hangers at Wal Mart but Dollar Tree had some as well. The ornaments  were actually 10 cents each ( 30 for $2.97) and a small square of blue fabric to represent Linus' blanket. I didn't have a single scrap of blue fabric anywhere to be found so I had to buy some. Since I hadn't spent anything for this project I splurged on blue flannel just like the blanket :) but any light blue cotton would look like the blanket.

Tuesday, November 29, 2011

Run, Run Rudolph!!!

It doesn't get any cuter than this...  This was our last Afterschool Art Camp of the year and we had so much fun. We sang Christmas songs - with gusto, I might add - and created these great holiday artworks. These are keepers for years to come!!
So much personality in such a simple project. I had some 8x10 Dick Blick canvasses left from an earlier camp. They already had two holes punched in the top. I added 4 to the bottom edge with my Crop-a-Dile. Don't have one yet?? Seriously, I love that thing. I use it constantly. Get one and you'll be looking for things to punch holes in.

We painted the bottom half brown and the top half is a deep "turquoisey" blue.  Rudolph's head is a small oval plaque from Hobby Lobby. The 99 cent size purchased at half price. The legs are jumbo craft sticks painted brown. The antlers are repurposed puzzle pieces painted black. We used red bottle caps or pom poms for the nose and wiggley eyes.

We added a sparkly red or silver pipe cleaner for the hanger and a strip of torn red and white striped fabric for the scarf. We painted dots of white for snow. ( We are in the deep South. When I explained that we were painting the white dots on the deep blue sky to look like a snowy sky behind Rudolph one child said, "Oh now I get it. I wondered about the polka dots. I never thought of it snowing on Rudolph!!"  It can be very warm on Christmas Day here. Last year Atlanta had a shockingly white Christmas. We were in Hawaii in shorts and bathing suits but friends sent us pictures via their phones. I'll take HI and the 70's in December anyday!! )


A couple of tan spots on his back made with the previously mentionned Spouncers and he is almost ready to run!! The fun part?? We attached the legs to the canvas with silver index card or notebook rings from the office supply. It makes him wiggly and super cute!
Seriously, how could you not be in the Christmas Spirit when this guy is hanging around?? They just make me smile!

**For a very low budget, practically free version of this use an 8x10 scrap of cardboard or matboard instead of the canvas, a plastic lid, like a peanut can, or a circle of cardboard for the head, tie the legs on with yarn or pipe cleaners. The bottle caps are free if you choose that for the nose or pom poms are so inexpensive. Everyone has a puzzle with a missing piece or the Dollar Tree always has puzzles. It would still be super cute- just a little more prep.

Monday, November 21, 2011

Fifteen Minute Nativity!!

That's what my friend K asked for and she needs it now!! We do this every year with the 4's and 5's and it has become a tradition. Moms tell me they have each child's little Nativity lined up on the mantel. This is simple, quick and inexpensive. They are so cute when little fingers make them and I'll try to remember to post pictures of their work after we do them the first week in December but... my friend needed the info now!


I use Crayola Model Magic in white - love.love.love this stuff!! You also need small foam stars and a small chipboard box plus a couple of toothpicks and some snips of raffia. I buy my chipboard boxes at Hobby Lobby when they are 40 to 50 % off and they are usually 99 cents full price. This year we are lucky enough to have free, repurposed little boxes for all 70 children!! I'm sure there are some great recyclables you could use if you are doing just a few. One year I used Altoids boxes and spray painted them but I like the rustic look of the cardboard. You could also tear a little square of cardboard and glue the figures to it, punch a hole in the top and turn it into an ornament.
You simply pinch off a piece of Crayola Model Magic ( again, no kickback, no free product - it's just perfect for this project because it is so soft and sticks together so easily) and roll 3 small balls and 3 short fat snakes. Joseph, Mary and Baby Jesus in the making.
I use a small, flat piece for Joseph's beard and Mary's head dress.
We push a small toothpick section into the head and body to hold them together. It slides right in and doesn't need to be but about a 1/2 inch long. Then you simply push Joseph and Mary together gently. Then place Baby Jesus across the Holy parents. That's it!! They stick together.
 ( if you have time you can make a small gold wire halo for Baby Jesus .) I use the end of a toothpick to give them eyes and a mouth - simple, sweet faces.

Put a small circle of glue in the bottom of your box and sprinkle with raffia. Add the
Holy Family.

Put the star inside the lid.

The last step is placing a sticker on the lid of the box with the Bible verse from Luke on it.
And you have a sweet little Nativity in no time at all.  It's easy for the children because even the little ones are used to rolling clay or playdough, it sticks together so easily, it's very few steps and all children love things in little boxes. We wanted a Nativity that the children could really do themselves!

I have several more Nativity ideas that I will post soon!!

Friday, November 18, 2011

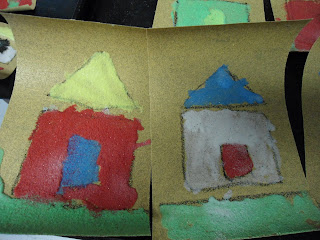
Sand Painting

Everyone loved Sand Painting!
 We looked at pictures of Native American Sand Paintings - they are intricate and amazing but use lots of basic, geometric shapes to create the paintings. So we did the same thing ( on a simpler scale!)
I always have them sand paint on sand paper. It adds an element of fun and is different from other surfaces we usually use.
This is what makes sand painting controllable for me and keeps the school janitor from coming after me!! I put the colored sand in containers that are large enough to put the whole piece of sandpaper down in it. I put the containers on large trays and put them on a table that is low enough that the child can easily reach into the containers.
                    We used tracers of basic geometric shapes to create pictures of our homes. We drew the outlines with black crayon.
 
Then we painted a shape with glue and went to the sand table to sprinkle the color of sand we wanted on our wet glue. It is so fun to watch their faces as they shake off the pile of sand and their pictures start to emerge. This is the hardest part for my 4 year olds- you can only put glue on one shape at a time or the sand sticks to the whole picture. So it's a fun process to participate in. Paint with glue, spread sand, shake it off and go back to the glue table and do another shape. You get to get up and go to different tables for the different steps in the process.
They turned out great!! They have a unique textural quality and the colors are nice. You can color your own sand if you want but a friend bought 20 bottles on clearance this Summer for just a $1.00 each so I am set. It is inexpensive and comes in tons of great colors at
 Hobby Lobby and Michael's.
They are a little curly right now because they are still drying and we used a lot,
 I mean a lot, of glue.

** a huge bonus to this project in a classroom setting is that boys really like this project as much as the girls.

How many days until Christmas????


This question can be exciting if you are 5 and fear-inducing if you are an adult shopping, cleaning and cooking in preparation for the big day!!
I can remember College Girl asking many times a day when she was little. ( In case you have small ones and they are already driving you crazy asking this question - let me assure you. You will miss it when they are older! )
I have found that an Advent Calendar is a big help with this. We actually did a countdown calendar for all big events - vacations, birthdays, etc. 
This reusable Advent calendar is a fun and easy project and each child can do their own counting down - no discussions on whose turn it is to "do" the Advent Calendar each day. We had our little camp this week to make these -it's a popular project and I do it every other year or so - my friend with 5 children sent her 3 youngest to make their own. Peace on Earth ?? At least at their house at Advent Calendar time!!
This is so easy! I simply used a cookie sheet from Wal-Mart. Just 97 cents! Dollar Tree is obviously a good place to look, too. I spray painted them Satin Black using that new Dual Purpose Spray Paint - primer and paint in one. It is a dream!! Worth the price for painting metal. Especially when you are doing 14!! And that is why I don't have any pictures to show you of the process or their finished projects!! I went over my class size limit of 10 due to popular demand and apparent inability to say no. I wish I had better pictures - theirs were soooo cute. Lots of snow!
I punched a hole in the top lip with my Crop-A-Dile ( see earlier posts if you are not familiar) and then we taped of a triangle with painter's tape. We sponged three shades of green craft paint inside the triangle and carefully removed the tape! We used q-tips and pencil erasers to make dots of white paint outside the triangle to look like a snowy Christmas scene. A little white spatter paint and it's ready to use!
I purchased pre-cut fun foam Christmas shapes for our "ornaments" We did not peel off the protective paper. We simply stuck a small square of peel and stick magnet tape to the back of each shape. ( I pre- numbered the shapes 1-24 and #25 is a sparkly gold star for the top of the tree. Older children could do this themselves.) I had painted International Coffee Cans black as well and we sponged a star on those with some snowy dots and that is where all our little ornaments go until their number comes up! That's it - very easy and very inexpensive. You don't even have to buy the little packages of foam shapes if you really want to keep the cost down. The first time I made this I just used circles of foam to look like round ornaments and a star for the top of the tree. Other than a 97 cent cookie sheet you might have everything else on hand.

FYI - 36 days 16 hours 10 minutes and 10 seconds from this post until Christmas!!

Saturday, November 12, 2011

Paper Lantern Fun!!

I bought these at the Dollar Tree. They are available lots of places and super inexpensive. They come in a wide range of colors, too. I have some that are solar powered on my porch but these take 2 AAA batteries to power the LED light.

If you aren't familiar with them - you just insert a small plastic or wooden ( depending on manufacturer) piece into the center and you have a perfect sphere every time. I am gearing up for a big event at church the beginning of December and these are part of the decorations. I gathered up my paper punches, cardstock, and glue gun. If you wanted the kiddos to make these then glue dots would work perfectly.

I punched and glued and cut a triangle out of orange polka dot paper and ...

.. Mr. Snowman was created in about 5 minutes and cost $1.00 !! I am making a whole garland of these to string up at our children's event in a few weeks. (Since I am in a church, we go with the  "Jesus loves You Snow Much" slogan and use wintry decorations. Now, it might be 65 degrees or warmer in Atlanta the day of the event or it could be freezing - we never know- but it puts us in the spirit !!)
and, I know, I'm sorry... I also made- you guessed it- OWLS!!!
They are so stinking cute. I used lots of punches and buttons for the eyes. I cut the wings out of polka dot scrapbook paper. It was just a circle I cut in half.

Next time I make owls I will move the wings a little bit forward and possibly drop the eyes a tad but it was my first attempt. I'm sure I'll be making more and I'll "tweak" them then. It really takes just 5 minutes to make these. I can see brown ones turning into gingerbread men faces and orange ones become pumpkins, etc. The possibilities are endless. A great Earth Day project could be done with the children - use solar powered ones, of course, and let them paint them blues and green to look like the earth! What fun.
  ** I didn't take a picture of them glowing. They look great. Just be sure to use the smallest dots of hot glue. It will hold just fine on the paper lantern and you don't want big globs showing when it's lit up.


Wednesday, November 9, 2011

Best Garland Ever!!

How fun is this??
 It combines the best of all the garlands out there. It is a string of lights - in this case clear with a white cord- and torn strips of scrap fabric. I call it my Rag Swag! You simply tear the strips into 1 to 1 1/2 inch strips about 6 or 7 inches long and tie 2 or 3 between each light. As you can tell, it's not an exact science. You just decide the width, length and number of strips based on your preferences. How full and raggy you want it. You can use random scraps or plan a color scheme. I've done them to match rooms and, of course, one with owl
 fabrics for my favorite Chi O!!
I've swagged them over windows, decorated for parties and now I'm getting one together for a Christmas tree. The possibilities are endless. The string of light costs just a few dollars and the fabric could be free scraps or just a yard or so makes a whole garland. So even if you want to buy a certain fabric it won't cost much.  If you want a Halloween one for next year , orange lights are 60% off at my Wal Mart amd Halloween fabric is on sale everywhere:)


The pictures don't do it justice but they are really cute - take my word for it !  I'll try for better pictures and post them if they turn out.
This is so simple the kiddos can help or make one for their rooms - they are perfect night lights- talk about cute !

Linking up at :
http://thecsiproject.com./

and
InspirationButton

Monday, November 7, 2011

Candy Canes ( to replace Candy Corn!)

I've talked a lot about candy in this blog - corn and canes, that is- but I'm not really a sweets person at all. I love my salty snacks!
This was a little token of appreciation that I made last year for all of my volunteers at church. I make a donation to Murphy-Harpst Home in their honor each Christmas. This home in North Georgia is the last hope for troubled children ages 9-16. It is a beautiful facility and they do amazing work. My volunteers love the thought but I like to add a little something for them to enjoy during the holiday, too. These could have a yarn or ribbon loop and become an ornament or you could just eat them!!
I use two candy canes to form the base. I needed to make about 100 of these ( yes, 100, so this post could also be called "What I did on my Thanksgiving Break!!") The most economical material was a brown flat sheet from Wal Mart. That is my go to fabric for many projects - $5.00 for lots of fabric. I tore it into 1 inch strips and then wrapped the candy canes together (I was the person buying 20 boxes of Candy Canes on the day after Halloween last year). I think I used about 18 inches of fabric for a nice plump body. I hot glued the end but you could just tie the bow to hold it in place. I added a jingle bell, a pom pom nose and wiggle eyes with hot glue. If children were making these then Tacky Glue would work. I printed the Legend of the Candy Cane on a bookmark. On the other side I printed the note saying a contribution has been made in their honor.

Then I cut  the tan envelopes on the diagonal and sealed them closed. I put a round Avery circle label on the front and stamped a cute little reindeer on the label. Added a red Sharpie dot for the nose and wrote the volunteers name on the label. I stamped "Joy to the World" underneath the label and slid Mr. Reindeer and the bookmark inside the envelope. Then the hard part - delivering them!!

It was cute as can be.
These would make great party favors or a nice addition to gift cards that you are giving this year, too.


Thursday, November 3, 2011

From Humble Beginnings...

... Spunky angels with tons of personality!!

 
Aren't they great?? The artists were 4 to 7 year olds and they completed these great folk art angels at an afternoon art camp!
We started with an angel "blank"
   which is simply a  2 foot long section of 1x4 pine. The first angel was made from a scrap but then when we had so many sign up for the class I had to actually purchase pine boards. I nailed two paint stick legs on one end and a loop of wire for a hanger on the other end and they were ready for the creative fun to begin. 
We began with a white basecoat and painted the face area a flesh color. We predominately used the Blikcrylic paints because they go on so smoothly and dry very quickly. We used small craft bottles of metallics and they were gorgeous. We sponged on stars and painted stripes on the legs.
And here they are - spouncers being used for the eyes and cheeks! Perfect circles everytime and the kids think they are so much fun!

We added a little glamour when we painted the faces! They turned out so great with so much personality and they had the best time with the eyelashes and fancy smiles! I love the face on this one. :)

A few finishing touches - this awesome garland was at Wal Mart the other day. We chose either gold or silver for our halos and then I used the nail gun to attach them to the top of our angels' head. It is just flexible enough to make a perfect halo - it bends into a nice circle. Wire with beads or silver or gold pipecleaners are good halo choices as well.  I usually use recycled milk cartons for wings on my angel and bug projects but, again, so many signed up for the class that I had to come up with something else. I couldn't gather enough milk jugs in the amount of time I had to get ready. I had some plastic mesh canvas ( like you use for needlework) so I went with that and I had to buy a couple sheets to have enough. Each 59 cent sheet made 3 sets of wings. This is a very reasonably priced project even if you have to purchase the wood. The 2 foot section was less than $2.00, the paintsticks were free from Sherwin Williams, I used paint I had except for the $1.27 bottle of metallic paint. The wings are free or 20 cents a pair and you can always find something sparkly and inexpensive for the halo. It would be cute to have the kids make some  for Christmas gifts and you could definitely reduce the size by simply using a smaller section of wood.

While we were finishing up the angels I asked the class if they had ever heard the
saying " Everytime a bell rings, an angel gets its wings..."  I happened to be going from child to child stapling on the wings wherever they placed them and the office phone rang and one of the little girls called out, "The phone ringing is like a bell and all our angels are getting their wings! It's true!! " We all laughed and our great angels all earned their wings.

Tuesday, November 1, 2011

Do you know Spouncers??

The name cracks me up but they are some of the greatest tools around. Spouncers. They are by Plaid Enterprises ( again, no kickback of any kind ) and I find them at Hobby Lobby and even in Wal Mart's now diminished craft area. They make perfect polka dots and I never miss a chance to put polka dots on anything. The kids love to use them , too. We used them to make the eyes on our large canvas paintings of owls a few weeks back and I have put many polka dots on the ornaments for 90 of my favorite girls. They get a lot of use around here- best $3.97 I ever spent. Go get some and get spouncing!