Showing posts with label clay pots. Show all posts

Tuesday, June 3, 2025

The Evolution of the Garden Guy


Many years ago (about 30 years ago because Mollie was a preschooler) we went to an amazing garden show in the old Sears Building in Atlanta. It was filled with the most beautiful gardens created in the warehouse like space. One of the gardens that had been created was home to a garden guy made from terra cotta pots. He was so much fun and Mollie loved him. I was inspired to try and recreate one for our backyard garden. I did and he was around for quite a few years. Funny enough no one can remember what happened to him or why he was dismantled!


This spring when I was cleaning out for the new potager I uncovered a lot of terra cotta pots and I thought it might be time for Garden Guy 2.0. I had used a bunch of the pots to make a Christmas Tree outside the greenhouseChristmas Tree outside the greenhouse in December so I had a pretty good collection of pots to choose form. I had some wire and a pool noodle to use for spacers. I just needed to grab some wire cutters and a serrated knife. 


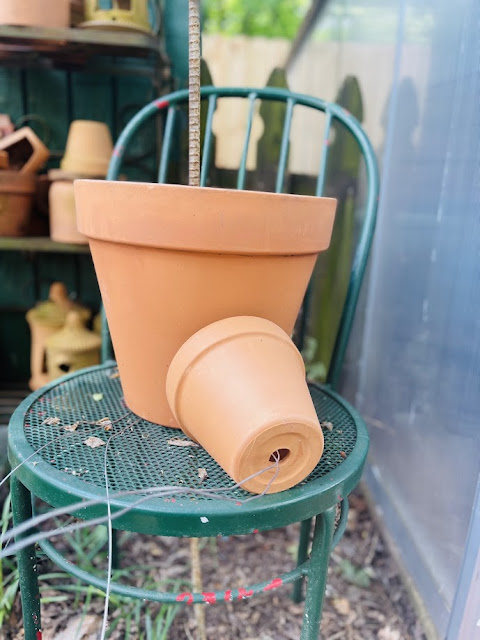
This is actually the old metal chair (all those pots get heavy) that the original pot guy sat in. I made a hole in the center and put a piece of rebar thru the pot holes and the hole in the chair to stabilize the whole thing and keep it from toppling over and breaking the pots. I also did this because I did not want to permanently glue the pots together. Everything is either wired or slipped over the rebar pole. It will come apart easily if I decide to dismantle him at some point.


I think the pots that form the body are 12 or 14 inch terra cotta pots. 


The rebar stabilizer is not noticeable once the guy is all put together and planted. 


The pot for the head is slightly smaller than the 2 for the body. I was using pots I had on hand. I slid them on the rebar to be sure the proportions worked and then removed them while I wired the legs on. 


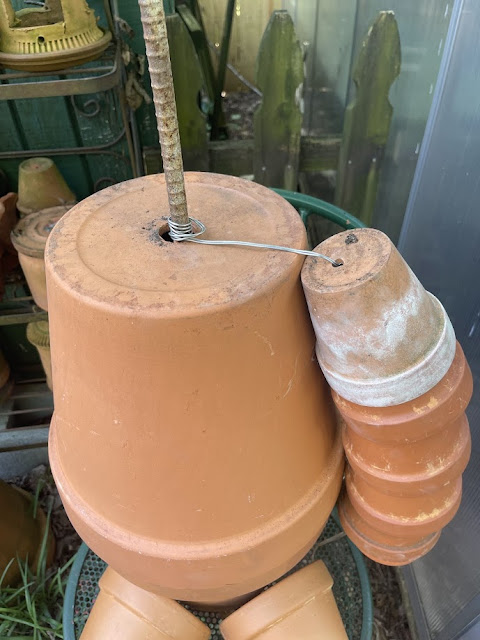
I doubled the wire just to be sure and wrapped it around the pole under the bottom "body" pot. Using a serrated knife I cut spacers from the pool noodle. 


Then I simply threaded a pot followed by a spacer on to the wire to create legs. The pool noodle spacers hold the pot in place. You could skip the pacers but you would need quite a few more pots for each leg or arm.


You just keep adding pots until the legs are the length and configuration you want. 


I turned some pots the opposite way to make "knees" that I could plant  in.


After the legs were completed I added the top body pot and began wiring the arms in place. Having the rebar is helpful in securing the arms. The clay pots are a bit heavy when strung together. 


After both arms were secured I slid the pot that makes his head onto the rebar. You can see that I turned one of the arm pots so that I could plant in it if I wanted to. 

I hammered the rebar into the ground a little more once everything was all wired together. 


And then it was time to give this garden guy some hair. I had this asparagus fern already. I ended up dividing it in half with my serrated knife and planting it to each side of the pot so it would definitely hang down like hair!


He fits right in by the greenhouse and the old shed. 


Let me know if you create a garden guy to keep you company in the garden.


P.S. I have used smaller pots to make a small scale, tabletop version of these for a garden party tablescape and they are just as much fun!


Monday, February 11, 2019

Things I love Month - Entry 3

Continuing this months look at "Things I Love" brings me to...
a good garden center.
Especially this time of year when I have Spring fever.
This year's case is quite serious 
and I'm already thinking about plant combinations for my big pots 
and small projects I want to do in the yard.
I'm so ready for Spring. 

I went to Charleston last week for a few days and managed to squeeze in a trip between family visits and beach walks to a new-to-me garden center called Hyam's.
It is the favorite nursery of my 90 year old cousin who is still planting flowers and growing beautiful ferns and such. 
She said it was worth the drive over to Folly Road so I went.

She has never led me astray on anything in all of these years 
(best place to buy shrimp, how to sail, best crabbing spots, driving a golf cart and more)
 and she was so right!!
I wanted to buy all.the.plants.


Look at these plant combos in their window boxes and containers.


And the petunia varieties were fabulous. 


We are a loooong way from being able to plant petunias in Atlanta but if we had been a bit closer I would not have been able to resist either of these!


I hope I can find the variety above here in Atlanta. 
Or maybe a road trip back to Hyam's in a couple of months to stock up!!

They had an amazing assortment of fountains.


And look at the painted decking floors in this section of the greenhouse.
Black and tan checkerboard. 
This is perfection. And inspiring.
I have considered painting a pattern on my screened porch floor 
and this makes me want to go for it!
How to keep Cooper out of a major floor painting project is a less exciting thought.


This makes me so impatient for my hydrangeas to bloom this Summer!


 I'm definitely using this idea. So simple but so clever. 
And a great way to draw the eye up in the garden.
I can't wait to do this. 
I've been looking to see where I can hang some of these
 and no one will walk into them and conk their head :)


Isn't this the greatest idea?
They've simply knotted rope and strung a variety of clay pots on them.
I think it's fantastic.
What do you think? Is this something you would try in your garden?

Do you have a favorite garden center that gives you great inspiration for plant combos and accents?
Do tell. I'm always up for a visit to a really great garden center!

Friday, August 19, 2016

On Garden Pond...

Remember when I was pondering a few months ago?
These are the ugly 'befores."
We had to move a pond due to another project 
and I was definitely  not  "all in" on the work involved.
My husband reallllly wanted a pond at this end of the porch still 
(there's another little one at the other end of the screened porch)
where he could hear the trickling water sound from "his" chair on our beloved porch.


So I grumpily began moving the liner and pump from the previous location.
I was determined to use what we had laying around.
After a few changes in layout plans I hit my stride and it went together very quickly. I had to build a small 'retaining wall" from some pavers we had hauled home years ago when a house nearby was having a concrete driveway poured to replace the creamy gold pavers that had been there for over 40 years. 
They gave them to us and we have used them for so many projects.


Then I filled the area with dirt left from the Boules Court project (here)
I used the pavers from the previous pond and a firepit project. They are not exactly the same color. As soon as it cools off a bit I will paint them with a buttermilk concoction
 and try to grow some moss on them. 
I love moss in the landscape and I think it unifies different finishes and things that look too new.


I had the two large pots and the one in front hanging out in my potting area. I divided some hostas and a few other plants and started planting.
I also bought a few plants from the  clearance area in the Lowe's garden Center. (No sponsorship here. Just a tip that they mark plants down to a dollar or two and all they need is some water and maybe a little fertilizer)
I bought the butterfly bush from in front of my Kroger for $4.99 and put it in the largest pot. It has doubled in size. 
I couldn't plant until I got back from my mission trips and things have filled in quickly.
#gooddirt

So this pond barely cost a thing to install.
Bargain plants filled in with some TLC.
And the trickling sound is relaxing when we sit on the porch.

So if you are pondering installing a small pond, I say go for it!

Thursday, May 19, 2016

Hydrangea Love!


(taking a little break from all the ORC chatter!)
I love my hydrangea bushes.
A lot. Probably more than I should.


 I had to dig them up and put them in pots a few years ago because
 I really love my two big Goldens as well and they are not easy on gardens.

The hydrangeas outgrew those pots and this year my handy husband
 used pallet wood and a plastic bin to create some great big planters.


An aerial view: We decided to build around the plastic bin to help the wooden framework hold up better and to allow for legs on the bottom so that we could level the planters on sloping ground.
We looked at a lot of ideas on Pinterest and then just went for it.
 I'm sure there are some good DIY's to follow if you want to make some. 
We didn't take step-by-step pics because there is a ton of info out there already!


They are very simple and rustic. 
We knew they would be covered by the plants and 
we really didn't need anything too formal or fancy. 
I just needed a very economical way to get really big planters. 
The pallets were free and the tubs were less than $5.00 at Wal Mart.
 Seriously, nothing swanky going on here.


And look at how the bushes have taken off!! 
They are covered in blooms about to burst into color!!
I'm obsessed!!


The hydrangea behind the pond is in a huuuuge pot and is loaded with buds this year, too.


I add something to the dirt to convince my blooms to be blue but I have lavender and pink blooms this year anyway! I think it must be all the extra soil added to those huuuuge planter boxes. I'm just happy to have so many blooms - whatever the color!


And this hydrangea bush is Limelight and makes all the other bushes green with envy!

#summerinthesouth

Wednesday, November 27, 2013

Baby In the Manger


We had a very fun family event at church last Friday night. It was planned to kick off our Advent season. We were about a  week early but the way Thanksgiving hit we had to schedule this way and it was really perfect. Everyone was relaxed and not rushed because we weren't in the busy December season where everyone has 2 or 3 events every weekend night.
The event was called "Starry Night" and we served dinner so we needed centerpieces to go with the theme for each table and the budget was small - really small. Like $0.00 :)
So I scrounged around at home and this is what I came up with.
I had some large wooden balls and large jumbo craft sticks. I painted cute little faces on the balls and glued them to one end of the craft stick (which I broke in half)


Then I tore long strips of white sheeting that I had on hand.
 The strips were about an inch wide and about 30 inches long. 

I put a dab of hot glue on the top of the poor baby's head and glued the strip of fabric down. Then I just started wrapping the baby's head and body 
until it looked like a little baby all "swaddled" up!
 

And there you have the cutest little baby all wrapped up!

I went out in the yard and grabbed some 6 inch clay pots I had stacked up. I soaked them in Clorox water in the sink and washed them out very well. They were going on tables where we would eat so I didn't want some creature to come crawling out :)
I stuffed a couple of plastic Publix bags in the pots after they were dry.

Then I snipped a bundle of raffia into strips and
 filled my clay pot (manger) with the raffia (hay.)

Then I printed the verse that was our theme for the event onto some gold chevron scrapbook paper. I punched two holes and threaded it onto a skewer. This made a cute banner that I stuck in the pot and secured with a dab of hot glue.


 I glued the baby in the manger and 
then I repeated it until all the centerpieces were finished. 
 
 
I tied some scraps of ribbon on each skewer and when we got them placed on the tables I tied a star shaped gold helium balloon to each skewer. I didn't  take a picture of all of them on the tables but it was the perfect centerpiece - the baby in a manger was nice and low and then the bobbing gold star balloon was up high and out of the way of conversation around the tables. They were festive, the children loved them, they were perfect for our theme and I didn't have to buy a single thing other than the gold star balloons at the Dollar Tree!

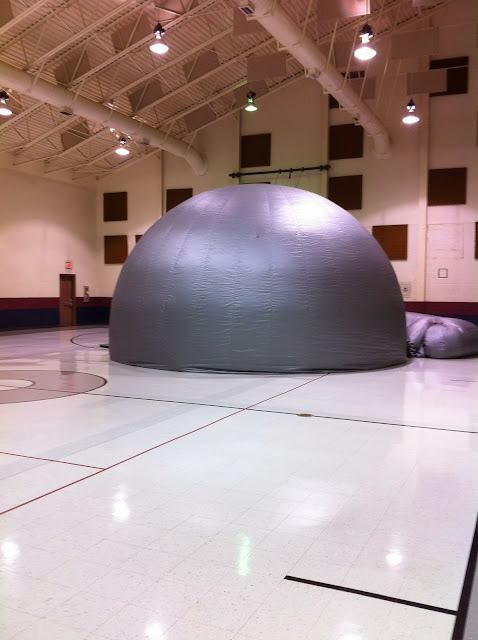
And because the theme for our Advent Kick-Off was appropriately stars, we had a huge inflatable planetarium in our gym. This thing was awesome and can seat 60 people inside. Our families loved it - the tickets were $5.00 and 
benefited our Youth International Mission Trip 2014.

It was a fun and exciting Starry Night!