Showing posts with label christmas decor. Show all posts

Thursday, November 17, 2022

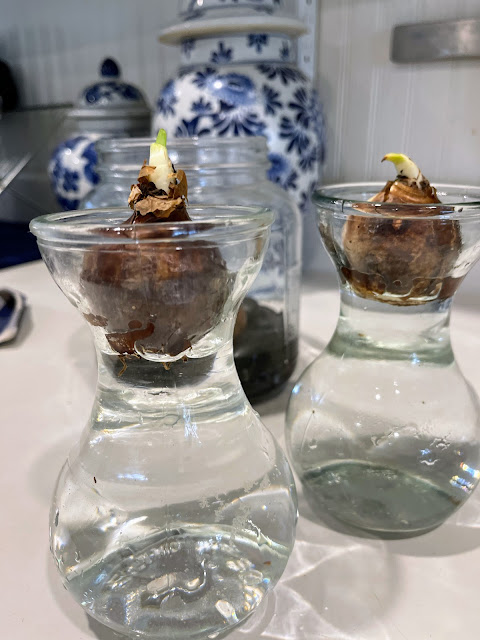
My Paperwhites Are Planted.

I'm excited because I am never, ever this on top of it. I usually have paperwhites for Valentine's Day not Christmas. It's actually a nice touch during the cold, gray days of February, but this year, just maybe, I will have paperwhites for Christmas!

Do you like to force paperwhites? I love them and I love the scent. Some people do not care for them but I think they smell nice. They don't smell as good as a forced hyacinth in the house but that is for late Spring.

This year I found bulbs at my local garden center. I never found any bulbs last year so this was a good sign for my rather haphazard bulb forcing history. There are plenty of places to order online but that requires even better planning!


I decided to use an old square-ish jar for some of my bulbs. The stalks will grow quite tall and the jar provides some support and I think it will be a fun look. I already had a bag of dark rocks from the dollar store so I decided to use those.


I nestled the bulbs on the rocks - wiggle the rocks until they are fairly even and your bulbs sit steadily on the rocks. This is important when you are adding the water. 


I used a cup to slowly pour water just to the bottom of the bulbs. Be gentle because you want your bulbs to stay in place. You don't want your bulbs to sit in water because they could rot but the water should just brush the bottom so roots can begin to grow. 


I also had several bulb vases that I saved from last Spring when I purchased hyacinths at Trader Joes. Just one hyacinth in bloom can make the room smell amazing. You just fill with water and add the bulb. So easy. 

Another reason I wanted to use the jar for my bulbs? It has the perfect neck for a ribbon! That makes it even more festive- especially if you give these as gifts!


I hope you try forcing some bulbs this winter. It's also a lot of fun to do with children because they can see all of the parts of a flower through the clear container. The paperwhites grow very quickly so it's very gratifying too!


Tuesday, December 22, 2020

Candy Cane Pagodas

 There's a touch (OK, more than a touch) of Chinoiserie in our holiday decor.

That's why when I saw Lydia Menzies post a 15 second reel on her IG about making little pagodas from mini candy canes I had to try it myself!!

This is not my idea - all Lydia's - but I tweaked it just a little. 

They are so cute. And quick and easy! 

I stayyyyyed up waaaaayy too late making these so I took a few step by step pictures in case you want to make some! 

You need mini candy canes. I decided I was going to skip the "frosting as glue" part of this and hot glue mine together. We aren't going to eat them so this makes them sturdier than frosting. And quick to put together. I used parchment paper to work on.

Cut the little candy canes out of the cello wrappers, and unlike real life building, start with the roof. I just used a dab of hot glue to create an upside down V with the curly part of the candy cane facing out. Don't worry about the hot glue blob - I'll show you how to fix that in a few steps.


Next up - the side walls. Glue two canes with the curve facing out as shown above.


Now you need 2 straight pieces to go across the roof line and the base. I found out that I could use a pair of kitchen scissors kind of like tile nippers to break the canes at the approximate length I needed. Put a dab of hot glue on each end and hold the sides in until the glue sets - just a few seconds really.


I wanted a door! I broke my cane so that the curved part formed a U and I glued that in as my door. So cute!

Next I added a short straight piece at the peak of the roof and in the center of the roof triangle. You could stop there if the glue doesn't bother you and depending on how you plan to use your candy cane pagodas.

OR...


I took some white glue and dripped it over the hot glue "joints" and on the ends of the upturned canes and over the doorway. Then I sprinkled some crushed peppermint cookie decorating sprinkles mixed with clear sugar crystals over the glue. This gave the pagodas a frosted, winter-y look and covered the hot glue blobs.


I left them to dry overnight. 
The hot glue makes them very sturdy but the white glue and sprinkles needed to dry completely.

The next morning I couldn't resist using them in the Holiday Mood board that was inspired by a contest on Instagram by @verryrobin_co!


These little pagodas will definitely be making an appearance on my Christmas dinner table! 

Saturday, December 19, 2020

Skirting the Issue!

 We've never had a Christmas Tree skirt before. We've never needed one because of where our tree spent the holidays. I've used galvanized buckets, a basket, a quilt, and a leopard fleece a couple of times to cover the base. But never an actual round legitimate tree skirt. 


But we rearranged our Family Room this Fall during the One Room Challenge. Our tree is in a more open spot and we can see the base of the tree.


 Aaaaaand we can't put our presents under the tree this year because.... Cooper!!


Do you see that paw juuuuust barely touching the present? And that look?? 

Mollie announced, after the tree was decorated, that we most definitely needed a tree skirt this year. Agreed. So off to the fabric store we went. We have a gem of a fabric store near us, Fabric and Fringe Warehouse, and I can almost always find what I'm looking for! 

We had only walked down 2 aisles when we saw THE fabric!! 


And they had huge rolls of  fringe trim in a clearance area for $3 for the entire roll - not per yard - the whole roll!! Wow. And one matched perfectly. We were in business!

Do you use a tree skirt? We love this one and now we wonder why we waited so long to be "tree skirt people!"


Wednesday, December 16, 2020

Do You Do Waterlogue?

I'm not the most technically savvy gal out there but I do love the Waterlogue app! 


 (A favorite image from 2018!)

If you've never "played around with it" you are missing out on some fun. Just download it from the "app store" on your phone and start creating beautiful pictures.

Some photos from your phone library work better than others but figuring that out is part of the fun.

I often forget about it until Christmas rolls around. That's my favorite time to use the app.

And let's face it - there's time to enjoy it this year! It's a great distraction.

Just for fun I'm going to post a few of my favorite "waterlogue" pics along with the original photos I used.


This set up for afternoon treats was part of a fundraiser :)


All about my favorite new wreath and velvet ribbon here and here.


You can see a lot more of our Library decorated for Christmas on Instagram.


Isn't this fun? It's interesting to see which images 'turn out' better!


OK, I seriously need to get back to work and do a little cleaning around the house as well!! 
I'm sure you'll see more Waterlogue pics on my IG before the season is over!! 


Give it a try!