Friday, October 14, 2011

Yellow Paint Blob??

Are you intrigued by the title??? Well, no creative project involving yellow paint blobs coming your way. I know this is not a decorating blog ( I really enjoy those, btw) but I am suggesting that you hang a mirror by the doorway that you exit your home from.
I went to Wal Mart yesterday with ( you see where the title is going now, dontcha??)
 a blob of yellow paint in my hair!!! Yes I did.
I know it was Wal Mart and not the Ritz, but still..... just get a mirror and put it by your door, I'm just sayin' ! 

Wednesday, October 12, 2011

The Itsy Bitsy Spider...

...glows in the dark. Oh, yes he does!!

 Mr. Spider is a popular project! Glowing in the dark is a definite bonus.
He is made from a circle of chipboard painted black. A dessert size paper plate or a circle cut from a recycled cereal box would work as well. I punched 4 holes on each side and used half a black pipecleaner for each leg. Then we slide on a few glow in the dark beads. I buy mine at Hobby Lobby or Michael's. The fun foam stars on his back are glow in the dark and I found those at Wal Mart. I'm sure they are at the other craft stores as well. The eyes are milk jug caps (from my previously mentionned giant tub of lids and caps) and google eyes. Cute enough. But wait...

He dangles from a paint stick. We used glow in the dark lanyard cording to tie him to our black paint stick. We tied on some ribbon, fabric sraps and glow in the dark cording and he is now a puppet on a stick :)

So here he is hanging around my office but he's a lot more fun when you turn out the lights and everyone walks their spider puppet around and sings " The Itsy Bitsy Spider" while he glows!!!

Besides being cute, glowing and Halloween-y, he can be part of a lesson on spiders, the number 8, and 1/2 ( we cut the 4 pipecleaners in half to make 8 legs...), why things glow in the dark, etc.


Tuesday, October 11, 2011

Art Camp was a HOOT!!

I have been gearing up for some afternoon art camps. I try to mix it up - some weeks we paint on canvas, some weeks we put together folk art and use wood and other found materials. This week we painted - and you know the saying, "Go big or go home!!??" Well, we didn't go home! We painted on 16 x 20 inch canvasses from Dick Blick!! And you should have seen their faces when I pulled out those huge canvasses!! Sometimes we forget to let the kiddos "go big!"
A little hard to see but we used a pencil to outline our basic shapes. I had some very basic shapes cut from old manilla folders to use as guides- they were very large and basic. All the detail and personality came from the little artists. It's a little hard to see but they did a great job adding personal touches right at the start.
The next step was to paint our pencil outline with a 1/4 inch flat brush in black acrylic.
( I use Blickcrylic that comes in large economy bottles that you can add pumps to. I use it because it is economical, has  nice coverage and comes in basic and a few specialty colors - not because I get paid by DB to endorse- I wish!!)
Then we used nice warm colors to paint our owls and moons. Some were full moons and some were cresent moons and some were blue moons - all up to the artist.
We painted our branches.
 
And then we painted our backgrounds in nice cool blues and purples - complimentary colors to our warm yellow and orange owls!
 And there you have it - amazing artwork. And did I mention that these artists ranged in age from  age 4 to 4th grade. Now you are really impressed. I am. Their parents were, too :)


** Disclaimer. Just in case you think I only paint owls and candy corn, don't give up on me. I also like candy canes - a lot. So hang in there - we'll be going from candy corn to candy canes soon enough!

Sculpture!

I took a long weekend  and dashed to the coast, Saint Simons Island, to attend a wedding!! It was 4 days of sun and fun and a morning on this amazing beach....
Driftwood Beach on Jekyll Island, Georgia.
 It was incredibly sculptural and a lot like seeing things in clouds ...

... definitely a gator!

The pictures don't do it justice. Go see for yourself!
 I told some of the people who were in town for the wedding about Driftwood Beach
 and they all came back raving about their visit.


Tuesday, October 4, 2011

Am I the last one???

 Am I the last one to know??
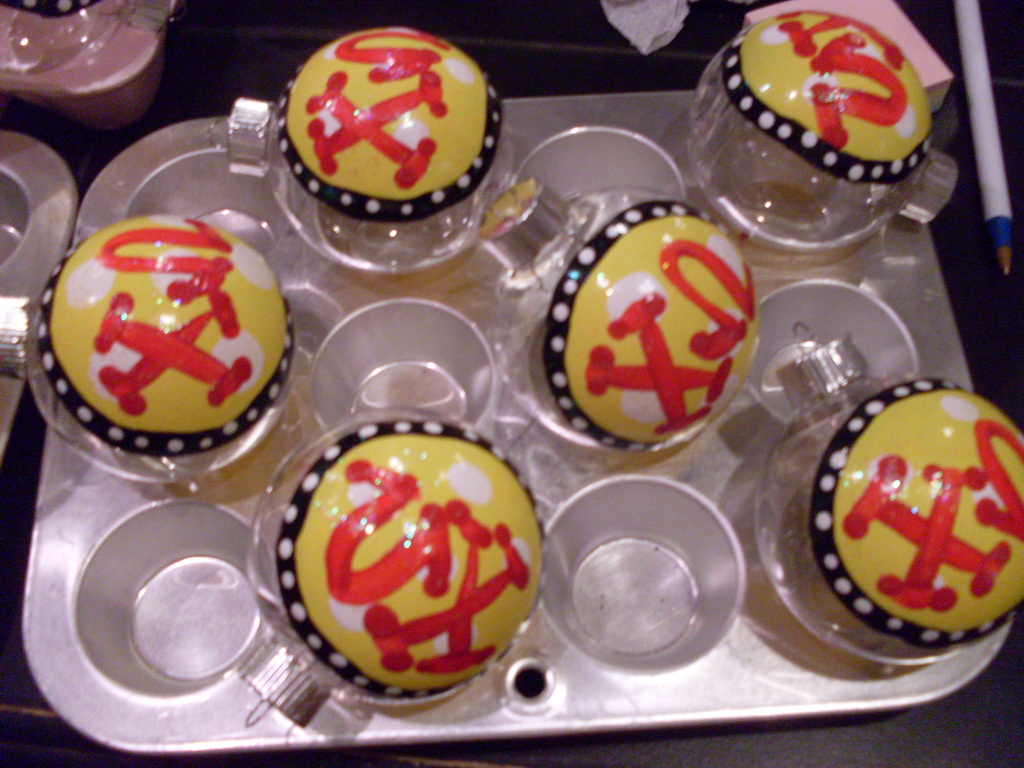
After painting literally hundreds of Christmas ornaments ( and other round things) over the years I just figured it out this week. The best way to "control" ornaments while they are drying is in my Pampered Chef mini muffin tins!! Who knew?? Not me, obviously! When I paint ornaments I am usually producing quite a few and it's tricky propping them up all over the place while they dry.

Well, I pulled my mini tins out the other night and they were a lifesaver. I'm painting about 90 of these ornaments for some of my favorite girls and it goes a lot faster with a good drying system.
So just in case you didn't know either - mini muffin tins are great ornament drying racks!!

"It's a Pumpkin Totem Pole!!"

That's what my friend Carrie said when she saw these guys!! Too funny. The stacks of pumpkins - I told you I was painting pumpkins like crazy- are for the silent auction at our  church craft show  this weekend. They are a spin off of the the large flower I made this Spring.
They are painted on old burner covers, metal platters from the dollar store and pizza pans. I had some of  these on hand but they sell the burner covers, metal platters and pizza pans at the Dollar Tree so even if you buy new - $3.00 for the pumpkins. A spritz of metal primer and then just paint them orange and put some super cute faces on them. The bucket was a dollar at Michael's. I added the polka dots with craft paint.
I used some quick set cement to secure a 1x2 in the bucket. It's 4 feet tall and painted green. The 1x2 cost 98 cents and it made two totems! The 50 lb. bag of quick set cement was about $6.00 at Home Depot and I have enough left to do 2 or 3 more and I made 3 already. So a good deal. You could use Plaster of Paris if you were keeping the totem inside but the cement makes it ok to put outside
 on a protected porch.
I put some crinkly Easter Grass in the bucket to cover the cement.

I tied ribbon and strips of torn fabric and tulle around the 1x2.
 The pumpkin faces are just screwed to the 1x2 post.
 
I put these guys outside my office door where the flower was all Summer. The kids noticed it right away this morning and loved it!! It's pumpkin time and it actually feels like Fall this week in Atlanta!!


Linking up @:


Also linking up @ http://www.itsybitsypaperblog.com/  Be sure to check out her great Halloween ideas linky!!

Linking up at http://www.southernlovely.blogspot.com/

Monday, October 3, 2011

More corn...

I know... more Candy Corn. It is an obsession but such a fun classroom and art opportunity. A 97 cent bag of Candy Corn is worth it's weight in gold - you can put it in jars and estimate how many are in each jar ( winner takes home CC saving you the calorie intake), you can play bingo and use the Candy Corn for markers, you can do a lesson on thirds, you can do a lesson on color mixing in baggies or you can take two minutes - literally - and create a Candy Corn stamping center.
Here are the raw materials: a clear plastic lid off a box of notecards, a triangular make up sponge and hot or waterproof glue, and (optional) wooden beads.

I cut the sponge into thirds and the box top in to 1 1/2 inch squares.
Simple as that.

Then I hot glued ( because I didn't want to wait for waterproof glue to dry because I wanted to use them NOW!) the foam piece to the clear plastic square. Then to make it easier for little fingers to hold I added a small wooden bead that I had hanging around to the top. A spool or small square of wood could work as well. I did a set without the bead and they work fine, too.
Then just squeeze out some yellow, orange and white paint and let your little stampers go to town. They can look at the jar of real candy corn for inspiration but the great part of this project is that it doesn't matter if they get the section they are stamping turned the "wrong" way or not. It still looks like candy corn!
This is fun because they can choose different colors of paper to try stamping on - what happens on white?? It doesn't cost a thing to do this center - everything is stuff you have on hand and they will spend a lot of time stamping away! It's very freeing and fun but they are also thinking, thinking... what stamp/color next?, how many parts to each candy corn?, concentrating on lining them up ( a little co-ordination work) and more.
See,  I told you -Candy Corn is a great thing!!