Tuesday, August 23, 2011

The next best thing since sliced bread ...

Shaving cream and glue!!!
You just mix together  "equal- ish" parts of shaving cream and glue ( please do not measure- that takes some of the fun out of it - just squirt and squeeze and mix!!) 
Because of the glue in the shaving cream it dries puffy and dimensional! 
I have used this fun stuff for all kinds of projects like snow and snowmen. Just use a spoon or paint brush to make the 3 circles and then because the mixture is half glue you can just stick the buttons eyes and fun foam nose right in the wet mixture - it will stick! We sprinkle Mr. Snowman with a little crystal glitter and then dip 2 q-tips in the glue mixture and add our arms, too.
It's great for Eric Carle's Little Cloud and weather units. We've made clouds and rainbows for our Creation activity. The possibilities are endless...
We've used it to make waves, too. So it's perfect for any stories or units about the ocean. Even Dr. Seuss. Here is a One Fish, Two Fish activity that's a lot of fun. We created our waves with the shaving cream and glue mixture. Sprinkled it with blue glitter. A few fun foam fish and some stickers.

Then we just matched up our  word and number stickers with the correct fish!!
You could add a little blue tempera paint and go for a Thing 1 and Thing 2 project!!

And then I just had to know if it would glow in the dark...
So I did a little spooky ghost test project....
 
I made a ghost with the "regular" shaving cream and glue mixture and added some google eyes.
Then I added in some glow in the dark acrylic paint and painted my ghost...

It makes the mixture a little yellow-ish but it GLOWS in the dark!!!!!
Yeah! How fun is that?? So now I'm thinking you could use this for some cool space unit projects!!!
Told you it's the better than sliced bread!! One can of shaving cream and a bottle of glue makes enough for a whole classroom to use. It's inexpensive and smells yummy - do your projects after recess- ha! You can color it with washable tempera, add glitter and little items on your projects and you can make it glow!!


Owl tell you what else I've been doing....

I have been moving College Girl into a house and getting her ready for another year of college and I have been helping the Chi O's get their house ready for Rush. I have been planting flowers and working in their yard ( it's my own yard that needs TLC now!!)
I have also been making a lot. I mean a lot. of Owl Pixy Stix (like I've posted about before) for one of their Rush goodies.
See? A giant pile of owls in Chi O colors. What do you call a group of owls?? Are they a flock like birds?? I need to Google that one:)

Monday, August 22, 2011

Kool Aid Clay and Cool (not Kool) Bowls

                                                                                                                                      
This is one fun clay to make. And easy. And safe. And smells yummy.
I have been super busy for the last couple of weeks - I have been presenting at Preschool and Kindergarten Teacher Trainings all over the state and I have promised (more than once) to get this clay recipe on the blog! Sorry that it has taken so long. But here it is. I have been making it for years and it always turns out great!

Kool Aid Clay
2 cups of flour
1/2 cup of salt
3 tbsp of oil
1 pkg unsweetened Kool Aid
1 cup of boiling water
Mix flour, salt and Kool Aid in a bowl. Add oil and then boiling water. Mix until well blended and ball of dough forms. That's it - takes 2 minutes!
This has so many uses in the classroom or for a fun time at home. First of all it is so inexpensive and makes a lot. It doesn't contain anything but food ingredients so if a child takes a taste it won't hurt them. It doesn't taste good - very salty, but safe. It's easy to clean up when it hardens. You can roll it out, use cookie cutters, etc. And it's fun to test the sense of smell. You can mix up all different flavors of kool aid and do a smell test- see who guesses the most flavors correctly!!

And now, cool bowls...

I found this little stack of bowls at Ikea the other day. I think they were less than 2 dollars! They are great for color sorting and color mixing activities. Sort M & M's or fruit loops or even colored paper clips. Doesn't quite work for  a Roy G Biv activity but any rainbow story activity would work with these bowls.
  They are just cute. And I had to have them!!


Wednesday, July 27, 2011

Puff, the Magic Paint, not the Dragon !

I had a great Monday and Tuesday this week!! It's so fun when a week starts off like this one. I went to Griffin, Georgia to participate as a presenter at a preschool teachers training hosted by First Baptist of Griffin and Georgia Preschool Association ( remember my GPA a few posts back ??)! We had so much fun!! Lots of dedicated teachers of young children, a wonderful venue and hostess ( Thank you Ms. Diane), great presenters, a fun evening out with these ladies and I must mention the truly Southern lunch they served every single lady at the conference - gotta love homemade chicken salad, pimiento cheese finger sandwiches, broccoli salad, fesh fruit, cookies and tea served by delightful ladies in the church kitchen. 
You are wondering what this has to do with Puff?? One of the tips I offered up was this fun, fun "Puff Paint." I promised the ladies I'd get serious about posting the things I had at the conference. I have made this Puff Paint since College Girl was little so I cannot definitely say where the recipe came from but if I had to guess I'd say probably Family Fun a long time ago. It is so easy, so inexpensive and so much fun.
In a bowl mix equal parts of flour, salt and water. Then you simply add a squirt of washable liquid tempera paint. That's it. Whisk together so it's smooth and fill a squeeze bottle. They are 89 cents at my Wal Mart and on a good week I can find 2 packs at the dollar store. You want the clear kind so you can see what color is in each one.
You simply let the children "draw" with the liquid paint on blank white paper. Put the papers somewhere to dry and after a few hours you have very cool "puff" drawings. This is always a big hit.
You could do a fun color mixing lesson with this puff paint. Mix up a batch with the flour, salt and water but don't add the washable tempera paint. Line the squeeze bottles up and then you can make one blue, one red, and one yellow.
Then ask, what happens if we mix the blue and red? Demonstrate and then they will know... it's purple :)
You can continue with other combinations until you've mixed green and orange and more!!

Another great way to teach color mixing???... Give each child a sandwich size baggie. Then squeeze a dab of washable tempera in one corner... maybe yellow. In the opposite corner squeeze another color... blue. Zip the baggie closed - be sure it's definitely closed :)  - and then let the children manipualte the baggies until the two colors are mixed and the new color appears... GREEN !!
This is very fun and actually all the manipulation is very therapeutic and relaxing for the children. Great little rainy day project!!

Sunday, July 24, 2011

O is for Octopus!

At our house "O" is usually for owl! College girl is a Chi O and owls are their thing. But I am gearing up for a new round of training presentations and I am doing some sample projects that I have been wanting to do forever but just couldn't make time.  I've been doodling ideas since Georgia Preschool Conference in March.
One of my "topics" in this presentation is a "Deep Blue Sea" unit. 

This guy, Mr. O, is a fun project.
I used one of the Dick Blick canvasses I like sooo much ( remember I don't get even so much as a free canvas from DB - I wish.) It is nice to send home a truly substantial project every so often but if budget doesn't allow this could be done for pennies with a paper plate, construction paper and yarn. Still cute and the lesson is still there.
I painted the canvas blue and spatter painted it with turquoise and white for the deep blue sea.
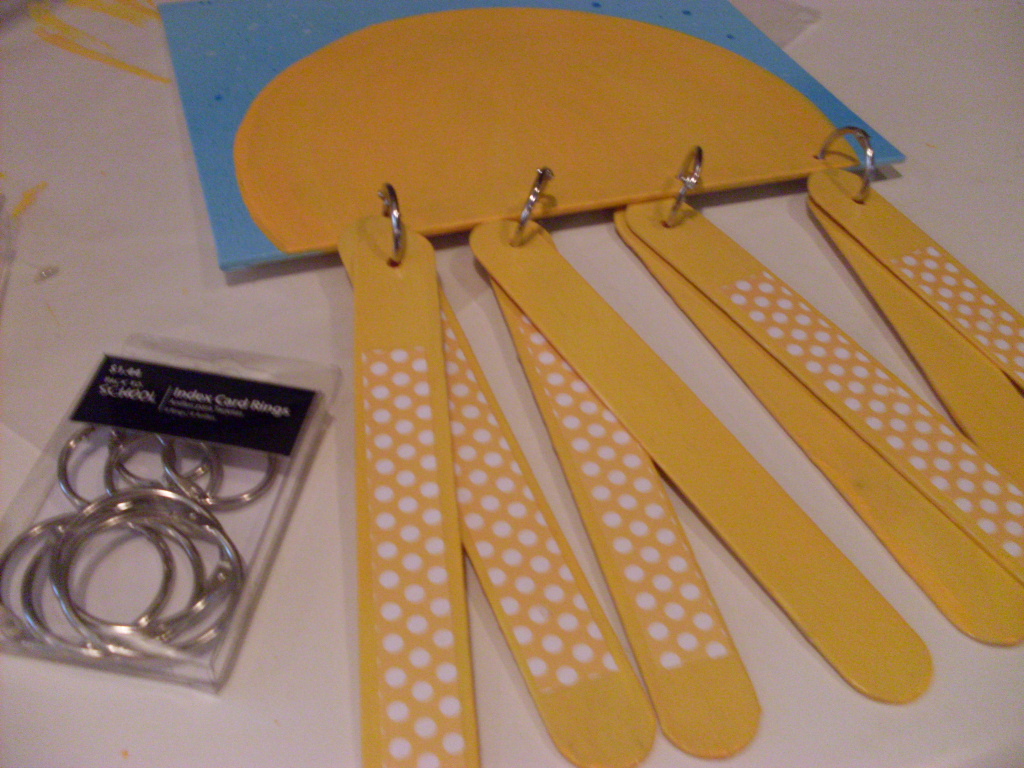
I used the amazing Crop-a-Dile to punch a hole in one end of 8 large craft sticks- 8. Do you see where we're going here?? I punched two holes at the top of the canvas for a wire or ribbon hanger and 4 holes at the bottom.

Then I found a circle to use as a tracer and
centered it over the side with the 4 holes punched in it - that's the bottom of the canvas.
Next question- what color to paint Mr. O?? You can allow total freedom or you can go with Orange like I did. O for Orange which is also the complimentary color of blue- don't you love it when a lesson comes together?? :)  There will be some pre-math coming up as well. :)
Next I wanted the 8 tentacles (jumbo craft sticks) to have the suction-y things just like a real Mr. Octopus. So I had to decide: go with painted polka dots made with a pencil eraser or decoupage polka dot scrapbook paper??? I tried a sample - yes, if you counted the sticks earlier you were right - 9!! I knew I didn't know which way I wanted to go :) so I made an extra tentacle!  I think the painted dots are "more the child's work" but I went with decoupage - we've done a lot this Summer in camps and VBS and it was fun so I went with that.  I just cut the strips to size and used the always awesome Mod Podge to decoupage them on. Either way works - your choice. I ended up leaving some plain and putting polka dot paper on 5.
So Mr. O is getting cuter by the minute. I used these little rings from the office supply to attach his legs. They are called notebook rings or index card rings and you can buy big boxes very inexpensively. It would also be cute to tie them on with ribbon or torn pieces of fabric or even yarn. Lots of choices for every budget! I mixed it up - I used some tentacles with dotted paper and some plain and I put two on each ring. A little math work here - you can number the legs, practice counting by twos, you could punch 8 holes and hang the legs individually as well.
Now he's stinkin' cute! I found these really cool bottle caps to use as big, ole Octopus eyes. They have white rims and clear centers so the orange shows through. Very cool. I glued those on and then put a google eye in the center. A litttle wire, a few scraps of ribbon and beads and he is complete!
He's a cutie and when you hang him up his legs wiggle and jiggle - just like a real octopus. He's fun, inexpensive and perfect for a lesson on complimentary colors, the number 8, counting by twos, and sea animals. Wow, Mr. O is a busy guy.
I am really "into" Octopuses? Octopi?? (whatever) right now. I don't know why.
But I think this guy is cute.cute.cute.
PS. There are 3 plural forms of the word Octopus... Octopuses, Octopi and Octopode.
Who knew??

Tuesday, July 19, 2011

More Christmas in July - Three Wisemen !!

In addition to the Nativity in the last post we also made the Three Wisemen or Three Kings at my friends' little art camp!! This is a basically free project using "stuff" you already have on hand. The Wisemen are made from paint sticks ( I have friends who believe I can make anything out of  a paintstick!! I'm trying!! I have that great Sherwin Williams contact who keeps us supplied and it is fun figuring out ways to use them up. I had over 400 children through the summer programs at work and we used 1200 paintsticks in a month!!! )
We simply painted the sticks in rich, royal colors. There is a little indention that makes a natural separation for the head. We base coated that in a flesh color. The beards are scraps of brown peel and stick fun foam. We just free handed those :)  Some beards were a little ZZ Top but that's OK. The crowns were cut from scraps of glitter fun foam and glued on. The "turban" was a scrap of fabric. We used fabric scraps around the necks and then the absolute best part- I just pull out all the glitter, glitter glue and odds and ends of sequins and confetti and we glue, glue, glue. No limits - we just give those Kings a ton of bling!!
The eyes are two dots made with a Sharpie- Sharpie are my favorite art tool in the world. Seriously. I must have 10 Sharpies in my purse right now and I always write and doodle with a Sharpie. People give them to me as a gift. I really love Sharpies.

A confetti tip- Every time we have a function or party or event and people toss confetti on the table... I gather it up at the end. I don't care what the shape is- I grab it and put it in my "magic confetti jar". Then when we have a project like this I bring it out and the kids go through and find what they want. They love it. And since it's free they can use all they want. They will ask me if they can use the "magic confetti jar!"
 I almost forgot- you can't tell in the pictures but I made a little torn fabric loop and glued it to the back of the middle king when I was gluing all of them together. Then they can be hung if you wish.


Sunday, July 10, 2011

Christmas In July!

Isn't that the cutest Nativity you've ever seen??? 
A friend invited me to do a "Christmas In July" mini Art Camp at her new church. I had done this theme  before and it is so much fun. It's 94 degrees outside and we are inside listening to Christmas music ( singing along), having cookies and milk and creating an adorable Nativity to enjoy in a few short months! It's so much fun to do this now before the hustle and bustle of the school year and holidays hits!! We took our time and had a great time!
We used a 5 inch clay saucer and 3 small terra cotta pots and 3 wooden beads to make our Nativity. The rest was just scraps of fabric and odds and ends of paint that we had on hand. The star is a small wooden shape that we painted and glued to a wire. We curled the wire a bit and glued it to the saucer. It's so fun - you have to have the star!!
Only 167 days until Christmas :) !!