Thursday, July 7, 2011

Sandcastles!!

Another fun project from VBS was building Sand Castles that don't wash away with the tide :)

We used any and every kind of recyclable we could find to create the castle. We glued and masking taped the parts together. This is a very creative and expressive project for all ages because it doesn't matter how you put things together or how much masking tape is used because the whole thing gets a coat of sand colored paint. We did this one time before and actually mixed sand in the paint - one of my volunteers almost didn't survive the experience - messy but fun!! This time we brushed them with glue after the paint dried and sprinkled on real sand from one of my beach trips - glistening white sand from beautiful Marco Island, Fl to be exact! Then we used shells and a flag to decorate our castle. The younger children could use peel and stick beachy fun foam shapes. Much easier than the shells which require a lot of glue. I mean a lot.
You could make this castle for a Princess Birthday Party centerpiece. Just paint it in pinks and purples and add jewels or let each "princess" decorate her own.  The flag could have the child's name on it. They are made from a straw or skewer and a scrap of cardstock.
This can also be used for a unit on Kings and Queens - just paint the castle in grays to look like stone.
Start saving your Kleenex boxes and paper towel tubes and see if you can build an amazing castle this summer!

Wednesday, July 6, 2011

Lighthouses- 6 feet to 6 inches ...

We had a great week at Vacation Bible School - 400 on site every day- and the Island Odyssey theme was a blast! I made this scene as our "photo booth."   We take a picture of each child in the themed scene and then they make a picture frame to fit the theme for their picture. These are "keepers." I have years and years of these from when College Girl was at VBS. ( You never outgrow VBS- College Girl came home on Monday and Thursday so she could be at VBS to help and then she drove back to school for her Summer classes!) 
The lighthouse is over 6 feet tall!! It is made from a concrete form that I bought at an industrial construction company. I spray painted it to match the one in the VBS booklet. I made the "beacon" from a large plastic container that had contained puffed cheese snacks. I spray painted the inside of it white and put white Christmas lights in it. I painted the lid black and glued on a couple of black recycled plastic lids. I put some beachy looking plants on each side, added a palm tree and sand buckets and we were good to go! The back drop is a tri-fold of 4x8 plywood panels and I painted the ocean background on it. It's the closest I've gotten to the beach in a while!! I could almost feel the sand between my toes...
We wanted every child to have  a lighthouse to take home so we came up with a way for everyone to make a lighthouse with a "real" light!
These are made from red plastic cups that I got at Wal Mart- 4/$1.00. Score. We let the children wrap white contact paper around the cup to make the stripes on the lighthouse. Did you know the design on  a lighthouse is called the daymark??
The older children had baby food jars for the light and the preschoolers had small plastic cups. We hot glued those on and then they glued recycled bottle caps together to make the tops. The best part??
We gave every child a battery operated tea light to put in their lighthouse!! They loved it!!!!
Their lighthouse "really" lit up !!!
Here's the tropical beachy frame we made for our pictures:
The backing is a recycled cereal box. We cut them into 8x10 rectangles and then decoupaged squares of bright tissue paper onto the plain side. We added waves, a palm tree, and shell shapes cut from fun foam. Very tropical and colorful :)

A bonus to all of this?? One of the VBS volunteers is a teacher and they are supposed to have a "wow" in their classroom for the start of school... Guess what her "wow" is going to be?? Yep, we are recycling. She is going to have a beach scene with a lighthouse over 6 feet tall!!
Even better- her dad is moving it for us!! :)

Tuesday, June 28, 2011

Sooner or Later...


It'll definitely be" later gator"!!
This week is Vacation Bible School and it's my gig so I will be off on an
 Island Odyssey for the week.
We are having a great time at VBS and I'll have some fun crafts to show you after all the fun is over.

PS. I made this sign for some friends who went to Florida- serious gator fans. They invited me to a party and I was supposed to take a dish to share but I didn't. I took this instead :) There was plenty of food anyway.
So...see you later gator!!

Tuesday, June 21, 2011

Pretty As A Peacock!!


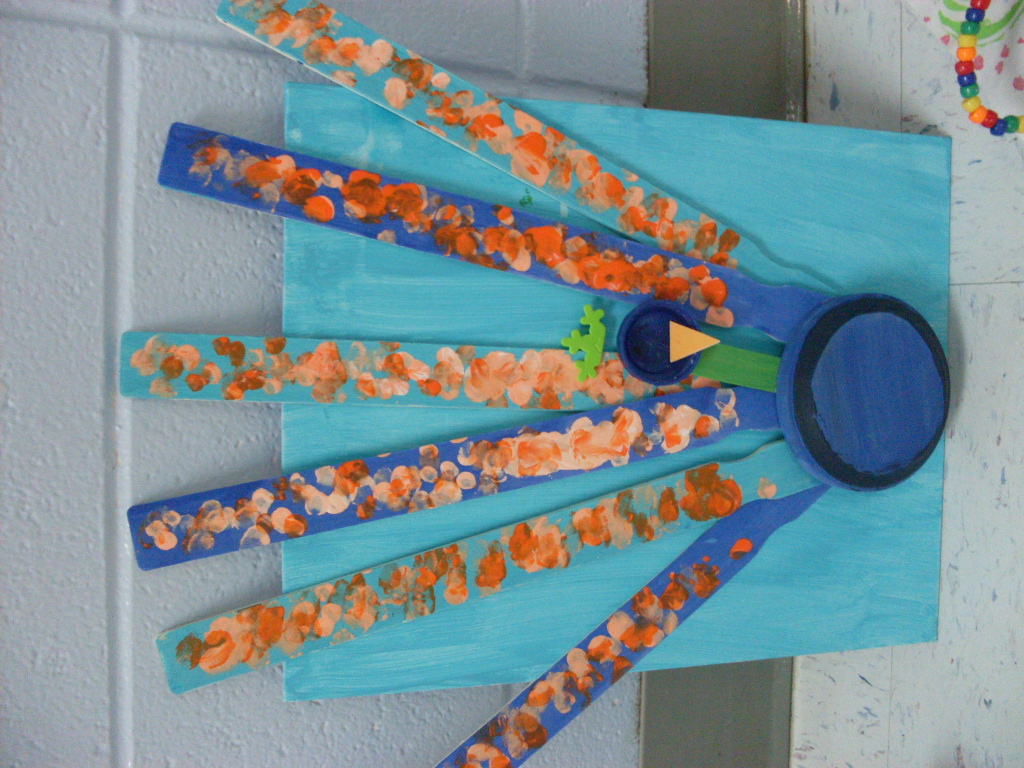
We made awesome Peacocks at Art Camp a couple of weeks ago.
We used a Dick Blick canvas as our background ( we had already used a repurposed board for our rock family portraits so we wanted to mix it up a bit.) The feathers were paint sticks from Sherwin Williams, the bodies were small wooden plaques ( 50 cents and then 40% off - score! ) from Hobby Lobby and the neck and heads were glued together from jumbo crafts sticks, bottle caps and other found items. We used wiggle eyes or Sharpies for the eyes, the beak was fun foam and that thing-y on the top of a peacock's head ( what is that called?) was made from half a peel and stick fun foam snow flake - thank you Ms. Becky for that idea!!

Since we were all about color and painting at Art Camp this year we decided whether or not our peacock feathers world be warm colors or cool colors. Then we used a different color family for the background - hopefully - or in the case of many of the girls, pink. And one little camper had a fairly monochromatic week - orange was the color choice for everything he did - no negotiating!!
The designs on the peacock feathers were made with our fingers. Lots and lots of blended dots. We added in some glitter paint at the end because peacock feathers shimmer.
We read a great book about peacocks and the designs and colors on animals.
It was called Bees, Snails and Peacock Tails by Betsy Franco.
Definitely a great book for a multitude of lessons! I ordered mine on Amazon.
And I, for the life of me, cannot get Blogger or Picasa to let me turn this crazy picture the correct way. But it's a really pretty one so try not to get a crick in your neck! This child completely got the whole complimentary colors concept - blue and orange!! Doesn't hurt that we're in the South and she's probably seen War Eagle and Gators aplenty- ha!!

Tuesday, June 14, 2011

Rock On!!

Last year our Father's Day gift to all the men at church was a little "Our Dad Rocks!" paperweight that the children painted at Art Camp. They were hilarious. Some were pretty accurate - children are so honest. We got a lot of details about the dads and their hair or lack there of- ha!!
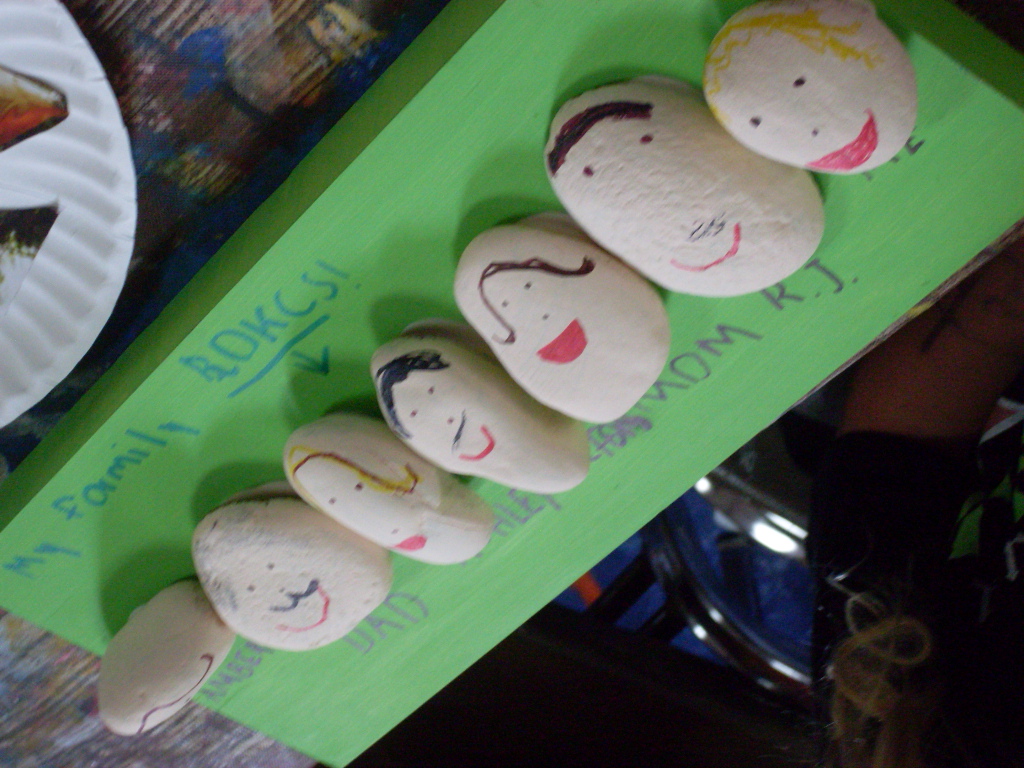
We decided that not only do dads rock but "Our Family Rocks!" so we made family portraits at art camp this summer. 
We painted a scrap board and some smooth round rocks. A little skin tone paint and some hair and we were ready for the details.


The teacher used a little Liquid Nails to glue the rocks to the board and then the children, depending on age, used paint or Sharpies to label their families. We put screw eyes and a wire hanger on  the board and we beaded the wire hanger. 
This project really rocked!! 
I made one also because I think my family rocks, too!! 
( sorry - it's so much cuter without the paper strips blocking the names!!)

This was a practically free project- the board was scrap lumber, the rocks were free and if it's a large group one bucket of rocks makes a lot of families or "dad" paperweights. The landscaper near the church donates all the rocks I use all year long but a big bag is only "3 something" at Lowe's or Home Depot. I had the paint, the tube of Liquid nails was a couple of dollars and the beads and wire were hanging around but again very little cost if you had to buy them. This could be done in a classroom for more than 20 students for less than $8.00 if someone  donated scrap lumber. 
These could also be glued to the Dick Blick canvasses and that would be less than 75 cents per child.
So, Rock On!!

Friday, June 10, 2011

The Big Bloom Is Back!!


Remember the giant flower made from found objects that I posted about a couple months ago?? Well, it sits outside my office door and a lot of my art campers just had to have one! So, that's one thing we did this week at camp- we made a really big flower!! We used the same found objects, odds and ends of fun foam, and some 4 foot tall 1x2 white pine. We drilled a hole through all the layers of lids, caps, frisbees, mixing bowl covers and whatever else we could find and used a screw and a wing nut to hold it all together on the 1x2 wood stem. Some made leaves and others tied  scraps of fabric on the stem like I did on my big bloom! It's a big project but really simple and they couldn't wait to take them home, show them off and "plant" them in their yards.  For those that didn't want to plant theirs outside we offered up some recycled family size aluminum cans or coffee cans. They could use Plaster of Paris 
to "plant" their flower in their "pot."
It's fun to change up the scale that you work in. We tend to do a lot of projects with children that fit in the table space right in front of them but they really love it when they get to go "big" like this flower. Here's a shot of them lined up down the hallway on "take-home" day. Love the variety, color choices and the detail they added to their petals. 
A big, fun project for a small investment!

Summer Art Camp Fun!!!

We are having a great time in People, Places and Things Summer Art Camp 2011.
 It's all about color and painting this week. One project that is very simple but is turning out to be so much fun is based on the "Follow The Line" books by Laura Ljungkvist. They are awesome. I found all 3 of mine on Amazon. The books are colorful and fun and focus on "contour drawing" which is simply continuous line drawing. You start a drawing and never lift your pencil or in this case black fine line sharpie- this is sometimes hard for younger children to understand and remember but it is fun to try it. We've had some laughs! First we had the children use liquid water colors and watered down acrylic ( we are using up odds and ends of those little  bottles  of craft paints so when they "seem" empty we put a little water in them and shake, shake,shake and it makes gorgeous "watercolors") to paint very large sheets of heavy paper. We just said to paint large areas of color and let them blend together. We wanted it to be very free and loose. We didn't tell them what they would be used for later. Then we let them dry overnight and the next day we read the books and talked about following the line...

 These are gorgeous- the color is amazing and the book they liked best was "Follow The Line Around the House." But I'm with this artist...
...  I would follow my line to the beach!!

Hope you are having a colorful summer!!