There's a lot of painting on burlap going on along with my daily job obligations and yardwork and housework and some extra job obligations... ( my husband seriously told me to stand in front of the mirror and practice saying "NO!".)
So in the midst of all of this... I need an Art Camp project!! Yikes. And then on Pinterest ( funny how I can always snatch a few minutes for that!!) I see a "pin" of an adorable color wheel flower from Deep Space Sparkle and I snagged it!! I'm putting a little of my own spin on it. But what an inspiring blog!! So fun. I also think I may have to do a variation of her A Color of His Own lesson!! But I just want to put it out there right now that I already have a pumpkin lesson that looks a lot like her pumpkins that I've been doing for years !!!
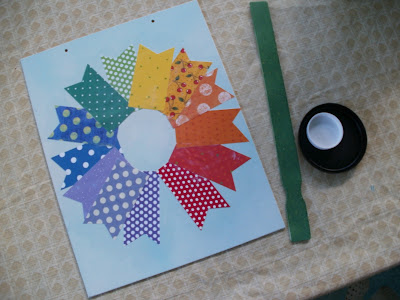
Anyway, I found a pile of scrap papers and cut them into 2 x 4 inch strips. I sorted them into "color" piles. Each student can choose one strip from each pile as we go down the "Roy G Biv" spectrum! I cut a little notch in the end of mine - I'm creating a zinnia. You can round them or create your own flower petal shape. If children are younger I would limit the number of petals to simplify the project. I also gathered a green paint stick ( leftover from another project and free from my Sherwin Williams guy), and a couple of recycled bottle/can lids and an 11 x 14 Dick Blick canvas. I spritzed on a light spatter-y coat of blue spray paint I had on hand. I punched two holes with my Crop-a- Dile ( do not tell me if you have not bought one yet) and grabbed my Mod Podge. And for the person who asked : No I do not sleep with my Mod Podge under my pillow!!
I traced a circle in the middle of the canvas using my largest lid as a guide. The lids will become the center of my flower. Then I used the MP to glue my flower petals around my circle making sure that I overlapped my pencil line slightly. That way my lid will cover all the ends of the petals when I glue it down later.
Then I cut a small circle of scrapbook paper - black and white polka dots, of course - and glued that inside my smallest lid. Lid color choices are up to each artist. With enough time it would be fun to stack up a rainbow of lids in graduating sizes for the center. I just grabbed two. Remember the whole over-commited thing?
After the Mod Podge dried on my petals I put a coat over the entire canvas. It dries quickly and then you can use Tacky Glue to add the paint stick stem and the bottle cap center. (Hot glue will work as well as long as an adult does this step.)
And then I added a wire hanger and some bead ... oh, and a ribbon to the stem!
Happy Flower and ... Oh Happy Day!!! It's Friday!!!! :) Have a super weekend!
Linking Up:


Too cute! I love all the colors! Found you over at Fingerprints on the Fridge! I'd love for you to come link this up at my Tuesday Time Out Party - open all week!
ReplyDeleteTuesday Time Out Linky Party
Smiles,
Melanie
Reasons To Skip The Housework {The Blog}
Tinker B Boutique {The Shop}