Wednesday, February 29, 2012

We Are Leaping Into St. Patrick's Day Fun!!

We have an extra day in February this year - it's Leap Year!! - but we were ready to get into our St. Patrick's Day art.
This project is a decoupage project. We learned that the word decoupage is a fancy French art word that simply means gluing down a "page" or paper. We also read the Legend of St. Patrick before we started gluing!

Each little artist decided whether to create a 4 leaf clover or a Shamrock  (3 leaves). We used a square (8x8) Dick Blick canvas that I painted blue in advance. Our leaves were heart shaped paper cut outs. Our stem was a triangle of paper and the button in the center
 is a circle.

Aren't they great?? And they so reflect the artists personalities... some are lined up perfectly, some are all the same paper even though there were lots of choices, some are swimming in Mod Podge and some of us who prefer to keep stuff off of our fingers had a hard time dealing with all the glue needed :)
The first two classes of 4 year olds really didn't want Mod Podge all over their fingers but the last class embraced it and they said they LOVED decoupage!!!

Sorry about the pictures - the lighting is terrible in the classrooms and I was probably hurrying because Mod Podge was going everywhere - haha! I lined up all the heart cut out choices assembly line style so they could choose their own papers at their own pace. The Mod Podge was applied with foam brushes and fingers!! I used my Crop-A-Dile to punch the holes for the fuzzy stick hanger. ( Can't call them pipe cleaners anymore!) I put a small black Sharpie dot in the center of each canvas to help my little artists get the points of the hearts headed the right way. At four and just turned five getting everything turned the correct way can be a challenge and this helps them to be successful.


We used foam brushes to spread the Mod Podge and I always put plastic table cloths so we can be as messy as we want.
Now we have lots of lucky Irish green to help us get excited about St. Patrick's Day.


Linking up:

Banner Aubrey BIG mixed copylinky-party

Tuesday, February 28, 2012

Thank You Theodor S. Geisel!!


I have a Theodor S. Geisel hat !!
Or maybe I should say a Dr. Seuss hat or more acurately a Cat in the Hat hat- haha!
I'm a huge Dr. Seuss fan. I love so many of his quotes!
I made this hat when College Girl was in 1st or 2nd grade. I wore it to read to all the classes in the library on Dr. Seuss's birthday. I wore black sweats and my Cat in the Hat bedroom shoes. The kiddos loved it and she was so happy I was at school in my hat. I bet she wouldn't be as proud if I showed up at college in my hat :)
So, this hat is practically an antique and before blogging so no step by steps. It is made from felt strips and posterboard to help the brim stay in shape. It is machine sewn and if I can do it, anyone can!!! Obviously if you only wear it on Theodor's birthday it holds up pretty well.

And here is Thing 1

And Thing 2 !!
Ha Ha!! My dogs really aren't named Thing 1 and 2 but there are some similarities in behavior!! Thing 1 is Biscuit and Thing 2 is Chloe. Chloe is being camera shy - she is our rescue and came to us abused and terrified. She is making great progress but is  still afraid of the camera. As you can see Thing 1 is not shy at all!!! He loves the spotlight!!

Have  a Seussical day and remember:
I love Dr. Seuss
(from Pinterest)

Monday, February 27, 2012

Food For Thought...

... a busy week with a lot of food related fun!

My Wednesday Night children made Lenten Snack Mix. ( I am the Queen of "teaching" snack mixes - haha. But seriously, if they eat it they will learn it! When I do my trainings for Preschool teachers I tell them all about my snack mixes!!)
I print out a label with the meaning of each ingredient and we stick it on a baggie or a cup.


Then I line up different trays and containers on a low table. I like the children to make the snack mix themselves. We use an assembly line. So there's another lesson tie in. I put different "tools" in the ingredients so that it is a manipulative/ motor skills activity as well.
You can see that the less expensive or healthier components have the larger scoops or spoons.

I love to throw tongs into the line up.

I put little spoons or itty bitty tongs in things like M&M's or chocolate coins - I make you work for those!!
To add a little math to the lesson I will put a Post-It Note in front of each container with a number on it and that's how many "scoops" you count out.

The beauty of snack mixes, unlike baking projects, is that a child can leave out any ingredient they do not care for and it still turns out. We often make a baggie to take home so that the lesson travels home, too.
This was the first time I have made a Lenten Snack Mix and it was a hit. Didn't hurt that it had purple candy and chocolate coins in it!! Balanced out the healthy raisins!!


And then on the opposite end of the food spectrum from giving up something for Lent, 
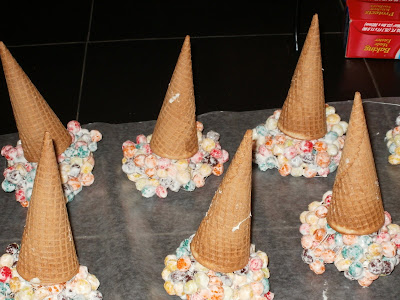
 here is a multi-colored, over sugared, gooey treat I made for the Bake Sale at our Mission Fundraiser Silent Auction that we had this past weekend. It is a combination of two things I saw on the internet - 1 from Pinterest and one from Michelle Allen's blog.
I used Fruity Kix Cereal and then  followed the directions for Rice Krispie treats.

The pictures are not good because I made them at midnight :( and I didn't want to use my "good" camera because I had melted marshmallow everywhere.
I made the gooey mess into balls ( that's what Michelle Allen did and added a stick like a popcorn ball) and then I put a sugar cone on top of them to create an ice cream cone looking treat like I saw on Pinterest but they used candy instead.

It was midnight and extremely humid ( we actually had a tornado watch it was so balmy in ATL ) and the balls wouldn't stay shaped and the cones kept wobbling off. So I made a cup of hot tea and sat up with my gooey mess to keep shoving those cones back into the cereal balls. All the time thinking that next year I will just donate $20.00 to the bake sale and call it good :)
I finally decided that I was going to bed and I'd see what I had in the morning :)
Luckily they firmed up pretty well so I packaged them in cone shaped cello bags and tied them up with bright curly ribbon and multi colored star garland to make them look FUN!! ( That is my basic bake sale technique - make it look really fun and entice the children because my stuff is up on that table with things made by serious "church cooks" - you know the kind that make perfect pound cakes and 40 ingredient recipes from
Southern Living Cookbooks!!!!
Ta-da!!! another glare-y picture but they were a hit and the kiddos loved their
gooey fruitiness!!
 I'm still not making them again, though!!

Thursday, February 23, 2012

24 Karat ?? No, it's Carrot!!

I've been making a lot of burlap door hangers lately. Not 24 carrots, but quite a few!!!
They are headed out the door to a silent auction missions fundraiser at church this weekend and to another fundraiser in the near future and to a couple of good homes for the Easter season, but right now it feels like I have 24 carrots hanging around.

They are everywhere in every stage of production. Luckily they are fun and polka-dotted so it's not too bad having a bunch of carrots around the house!


Linking Up:
PhotobucketThe 36th AVENUE- A creative DIY blog. Sharing tons of recipes, gift ideas, crafts, home décor and home improvement easy to follow tutorials. Come visit to make the ordinary EXTRAORDINARY on a budget! www.the36thavenue Follow on Pinterest pinterest.com/...#recipes #crafts #decor

Wednesday, February 22, 2012

Hopping Ahead to Easter...*

I have never used these little cotton rounds from the Make-Up department for anything beauty related. I'm sure they are great for removing eye make up or something. I just don't know. I do know they are really great for practically free art projects. You can buy a whole sleeve of these little circles for a dollar. Just grab some supplies you have hanging around and get started.
I cut one circle in half and slathered those and a whole circle with Mod Podge and then just mushed the ears to the head. The generous coat of Mod Podge will seal up the cut sides of the ears. The inside of the circle is like a cotton ball and needs the MP to keep it together. And it just all sticks together.
Then I gave it a dusting of crystal glitter because it is leftover from the January Art Camp projects (http://madebymolliesmom.blogspot.com/2012/01/remember-sparkly-snow-guys-children.html
and http://madebymolliesmom.blogspot.com/2012/01/irresistible-snowfllakes.html) and it was there. Good enough reason. If you don't have it then just go on to giving this guy an adorable face.

Just pull out your buttons and scraps of fun foam or felt or whatever. Just get creative. Just put a dab of MP on your bunny face and add the details. I made the whiskers from fun foam and the eyes and nose are buttons. That's what I had sitting around. You could use wiggle eyes and wire... doesn't matter.
Then I added some pink glitter fun foam for the inside of the bunny ears.He's so stinking cute. And easy.
You could glue him to a card, add a pin back and, ta-da, Easter jewelry, string them together for a garland with some plastic eggs or glue them on popsicle sticks for a puppet show if you are in a classroom.

* I will backtrack to St. Patricks Day.  I'm jumping all over the place right now.

Thursday, February 9, 2012

It Had to Happen...

... there had to be "one of these" for Valentine's Day. After pumpkins, gingerbread men, flowers and snowmen, everyone expects to see something for every holiday or season outside my door :)  So, it had to happen.
It's just the same as the others -  a bucket ( this time galvanized) with Plaster of Paris or quick setting cement to hold the 1 x 2 in place. I found the heart platter at Target for $2.99. Last year the Dollar Tree had big red plastic heart plates, but not this year, so I had to go for the $2.99 plate. I added green and white polka dot ribbon down the whole "stem." I contemplated leaves made from some cool found object but the truth is that I threw this together in about 30 minutes and that was all the time I had. Maybe leaves will happen next year!! And it's still cute and cost just a few dollars to put together!!

Linking Up:
Southern Lovely

Big Puffy Hearts!!

You had to know they were coming... big, puffy burlap hearts!!
A swirly pink one if you're just not into red...

...and then, of course, there had to be polka dots and black and white, too.
<3

Linking Up:
BLOG TITLE

Wednesday, February 8, 2012

Puppets on a Stick!


Just a sampling of the quick and cute puppets you can create from recycled toilet paper tubes and found items. Over the years, we have created all types of puppets this way. You can come up with a puppet to go with just about every theme,subject or holiday.


Of course, an owl! The main stick to turn these into puppets is just a jumbo craft stick glued to the inside bottom of the tube. I usually hot glue these on for sturdiness. If you are in a classroom setting (create them to go with whatever you are studying from Dr. Seuss to presidents to animals), scouts ( make them look like your troop and act out skits for badges) or Sunday School ( can't you just see angels or the Three Wise Men made from TP tubes!) where you are making a quantity you can prep these ahead of time. For the owl we added a regualr popsicle stick for a branch but you could actually use a real twig from the yard for the stick on this puppet and that would be really cute, green and free! The face, wings and leaves are made from fun foam scraps and buttons but you can use whatever you have on hand - felt, paper, wallpaper, yarn - you name it. Just throw supplies out there and let the kiddos get creative.
The pig has a bottle cap snout and of course, a curly tail ( made from a pink pipe cleaner!)
Mr. Bumblebee is created from scraps of tulle ribbon or window screen for wings and a bottle cap with google eyes. The stripes could be painted or made from strips of paper but I had yellow tape from the electrical department that had been clearanced so we played with that.

The possibilities are endless and there are always lots of TP tubes in the recycling bin ...

Linking Up:
NightOwlCraftingSouthern Lovely