One project at a time is actually plenty but that doesn't seem to be how it goes around here!
I had my #thethriftedporch refresh challenge going on in May along with my 11th One Room Challenge. But a very special opportunity also presented itself in May and I jumped in to a big, messy project alongside the others.
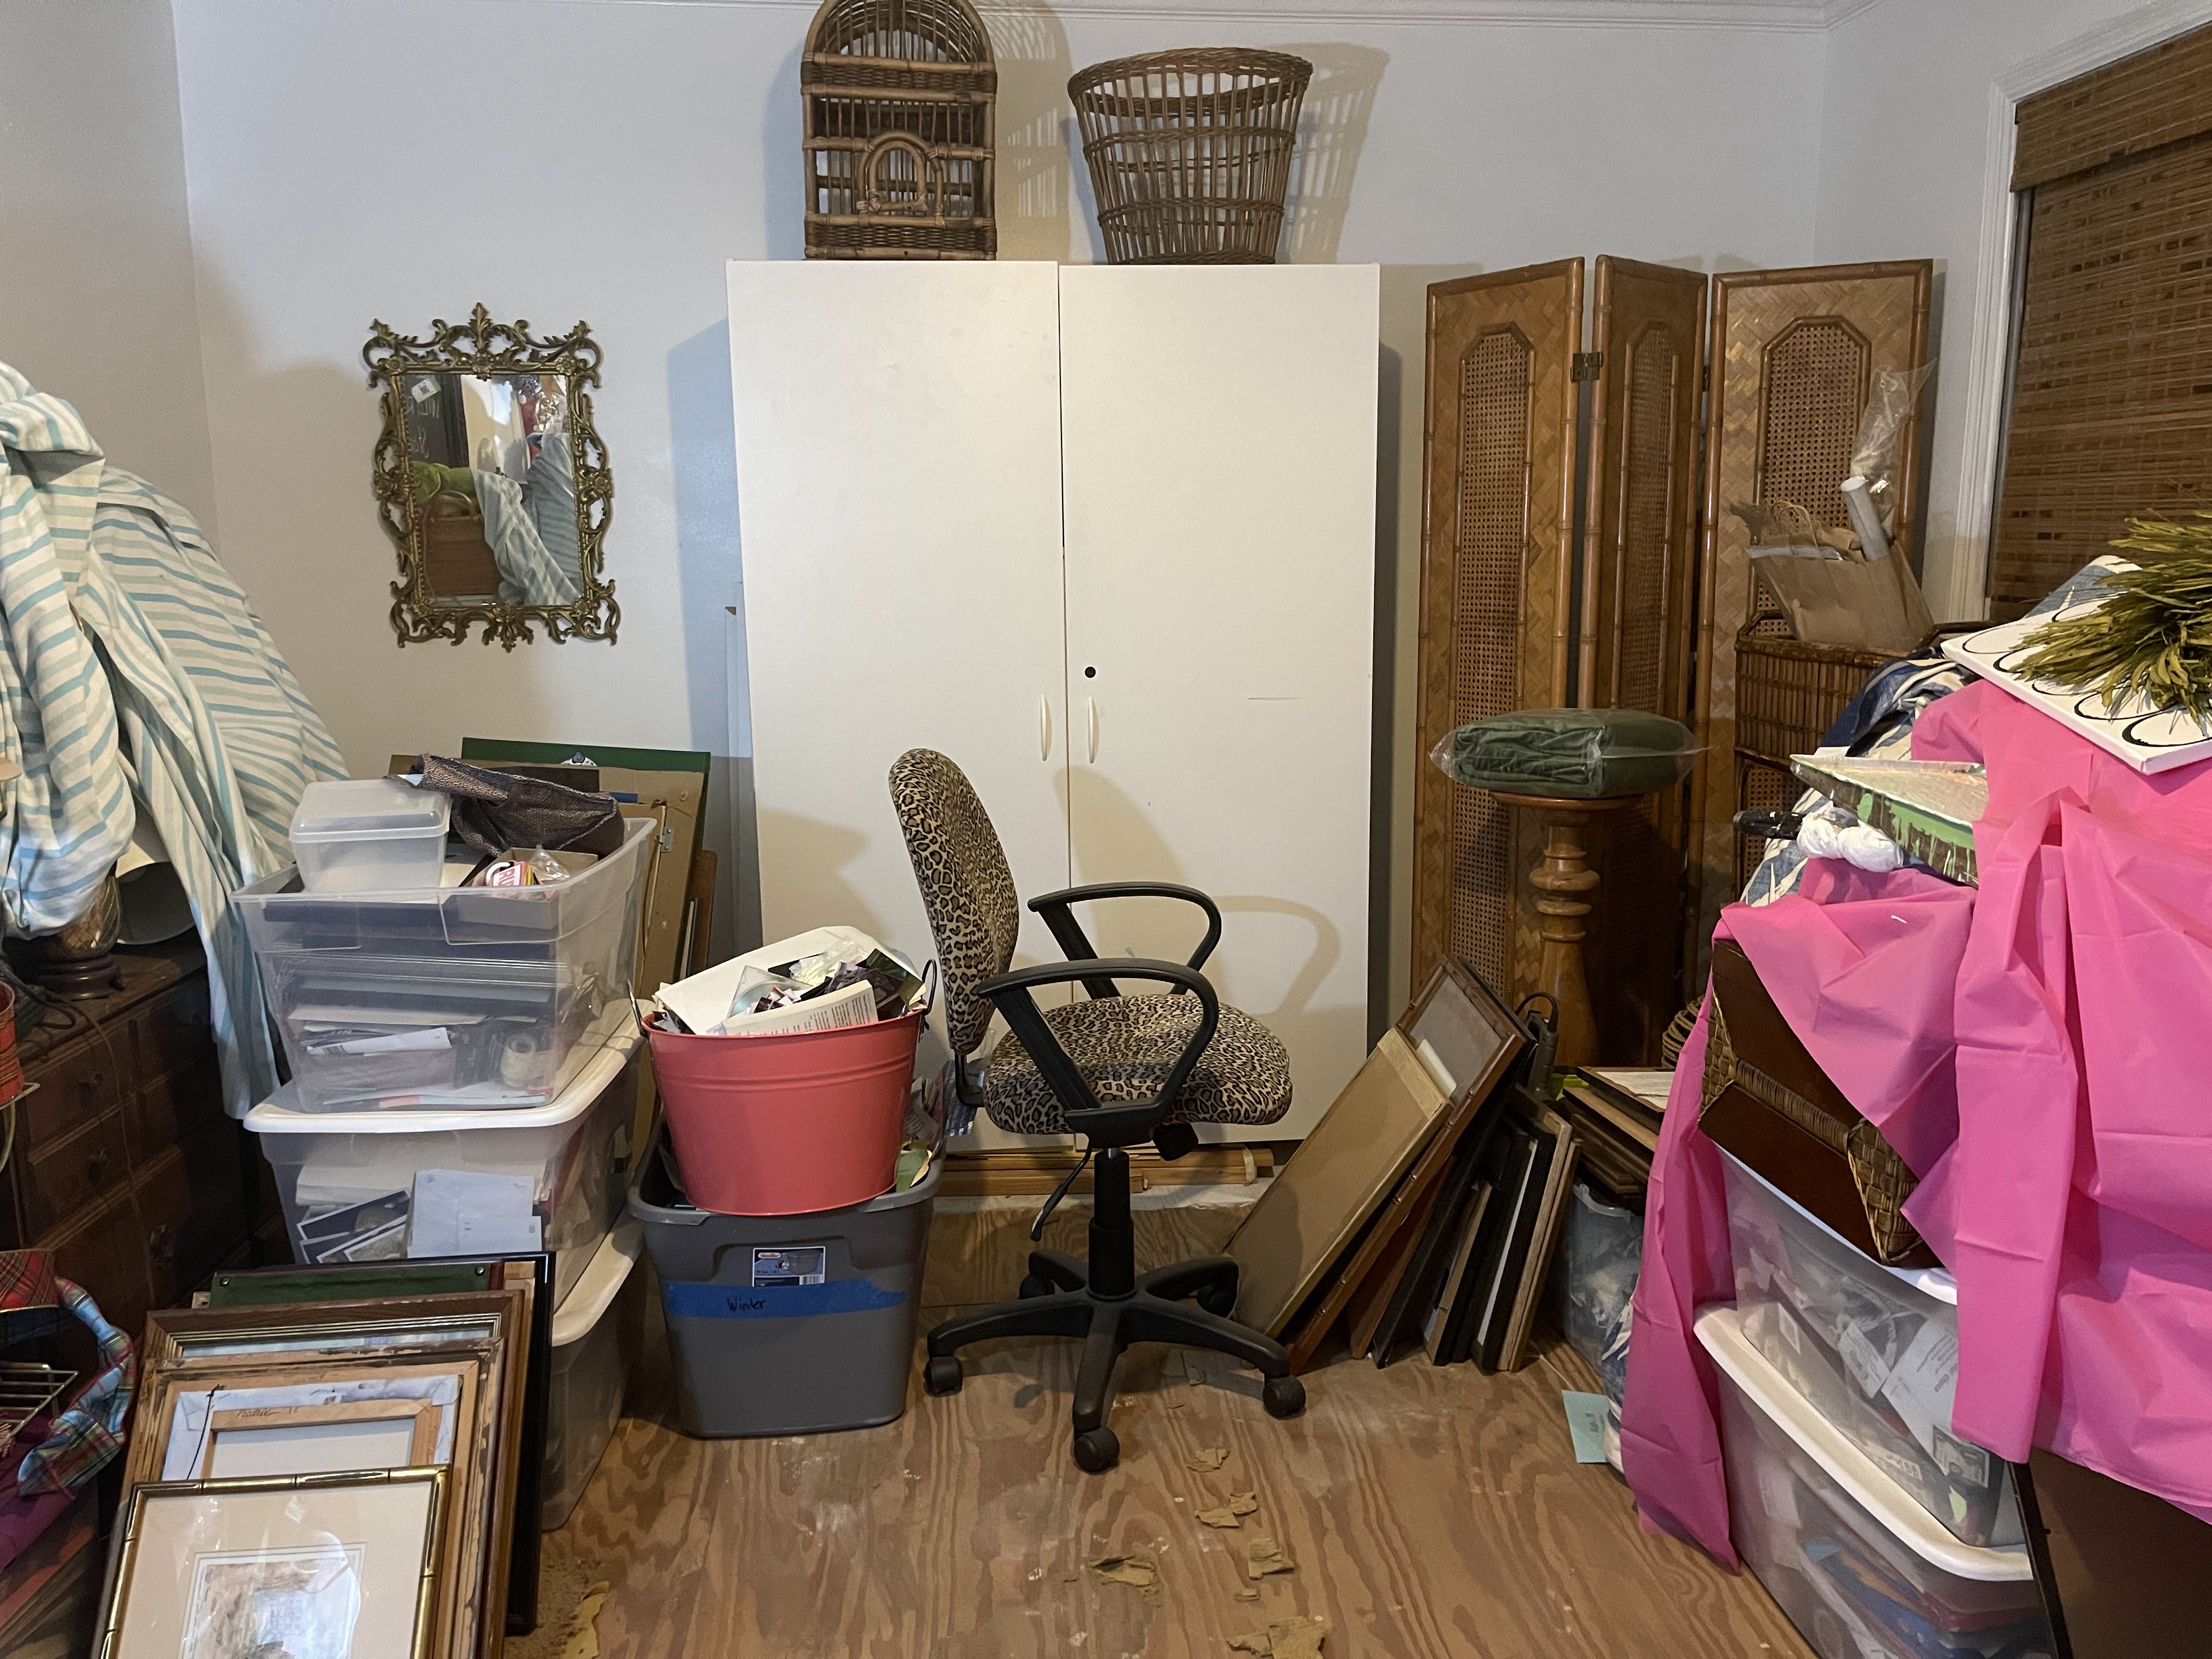
I was home alone for the entire month of May. Well, Cooper was here but Mollie and her dad went to Florida for the whole month for his sabbatical. That meant I could tackle the worst, junkiest room in the house. It had gotten out of control and was causing me a good bit of anxiety. Really. I didn't even take a true "before" picture. I knew this project would create a big mess in the rest of the house so having 30 days to accomplish the big clean out was going to be perfect! Spoiler: I didn't finish it. I worked on it continually but it was a lot of moving stuff, sorting, purging, etc. before I could even start to paint and deal with the old carpet in there. It dragged well in to June (and still going strong OY!!) but I'm so relieved I didn't give up!
This room is labeled "Living Room" on the original floor plan. When we moved in my husband needed an office with easy access to the front door. I insisted on French Doors immediately so that his stuff would be behind closed doors. I love those French doors in our entry. My mom made curtains to cover the glass and then years later I did a faux antique mirror finish on the panes. Then my husband went to work for a company and traveled extensively. He didn't need the big space and I took it as my craft/scrapbooking/studio space. I enjoyed it for years and then it just started to be where we stashed stuff we didn't know what to do with and things for our little vintage business Elizabeth and Payne. I kept saying I was going to clean it out and use it more as a studio "when I had time." Guess what?? I had lots of time last year and I didn't clean it out, use it or get back to painting! Obviously having "enough" time wasn't the issue. I had also been thinking that we needed a bed on the first floor because we have a lot of steps but I didn't want the room to look like a bedroom. I wanted it to look nice, have more than occasionally being a bedroom as the function. I've also always loved a sunroom but this house doesn't have one, we aren't going to build one at this point (plus we have a fabulous screened porch we use non-stop across the back of our house.) This room does get great afternoon light and would be a good place to overwinter the plants that don't fit in the greenhouse and moving the daybed in our seldom used guest room would be a great way to have a non-bedroom looking place for someone to sleep.
Whew- that's a lot of info but that's where this is coming from. And I wanted to use furniture, decor, fabric, paint that I had on hand. The budget was basically zero. Game on.
This is what was floating around in my head...
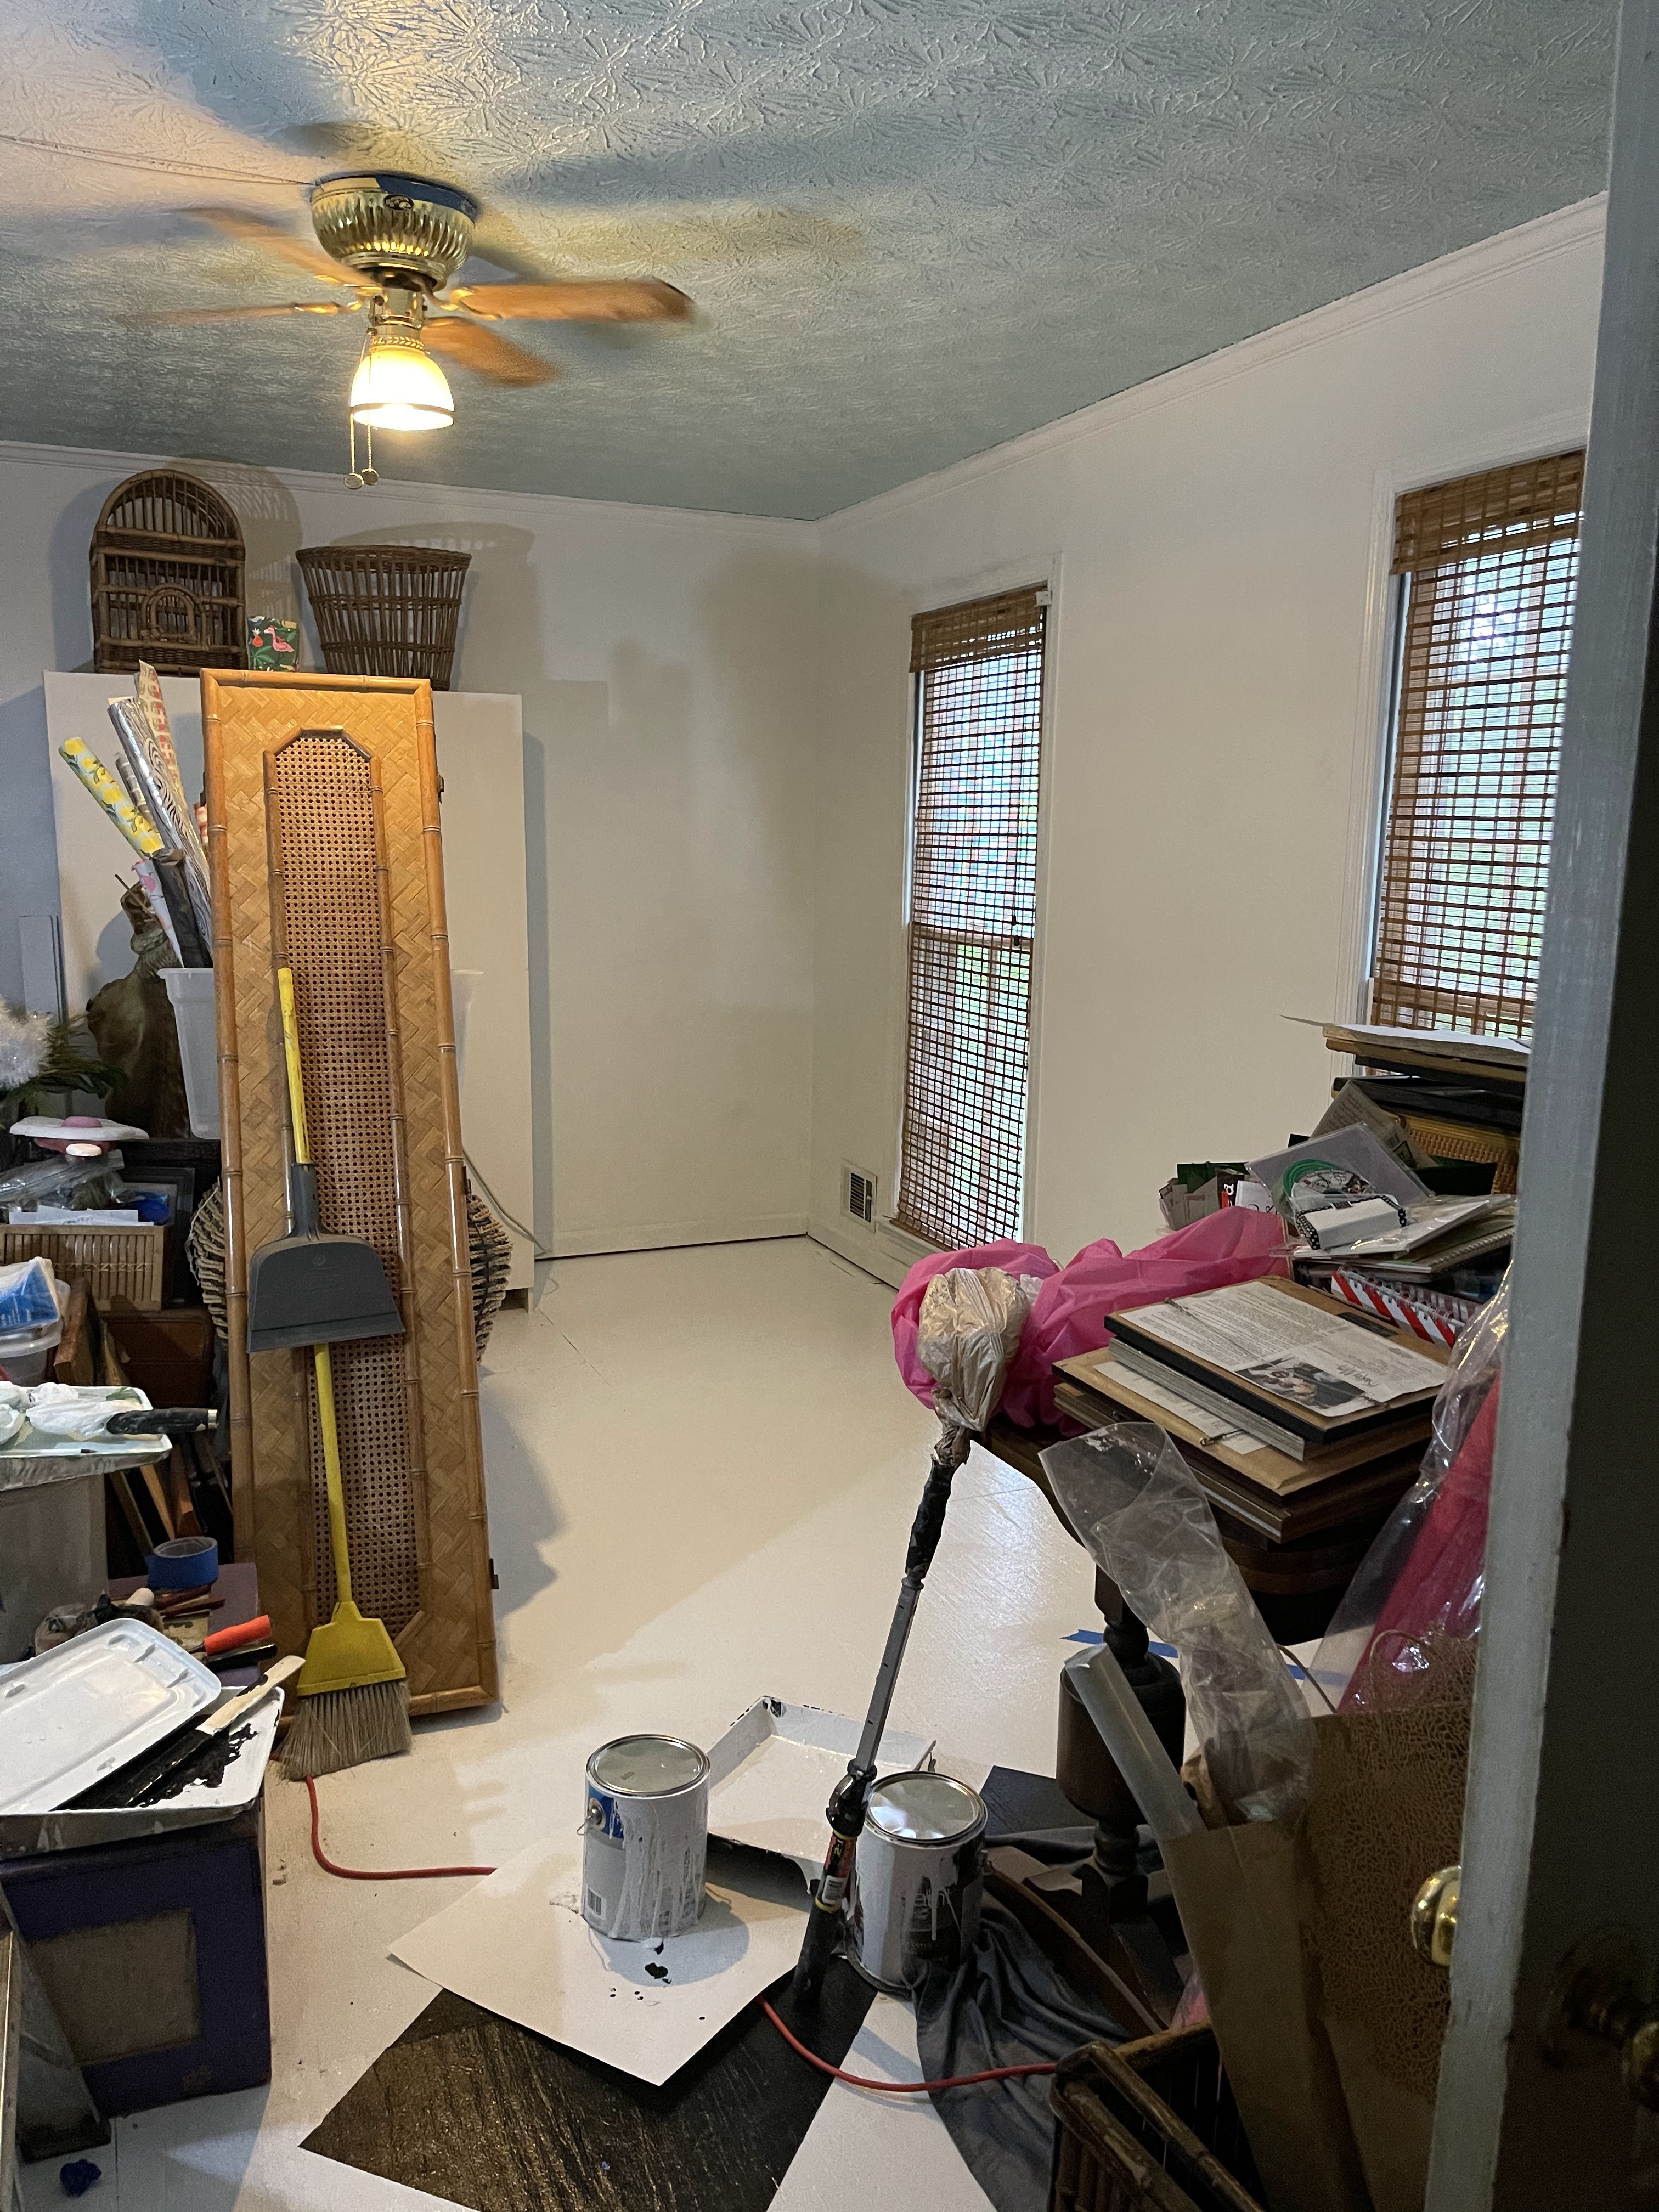
The room is fairly large and the floor still had the original builder beige carpet. (We kept the French Doors closed and never let anyone in the space -it was that bad!!) Our house is not charmingly old, just middle aged and all that implies, and the carpet had to go. Remember: zero budget plus the fact that lumber has almost tripled in cost this Spring. There is a post-pan demic shortage. So what is the most economical decorating tool out there (and my favorite!)?? Paint.
The plywood subfloor was in excellent condition except for a couple of spots and also confirmed my belief that wood quality has gone down over the last few decades. This subfloor had as good a finish as the "finished" plywood we purchased for our ORC flooring project.
The "shove stuff around and work in sections" method is not one I recommend but it is the only way I could make this project happen. Also, every time I pull up wall to wall carpet I realize that I just need to have wood floors and rugs because I obviously don't vacuum often enough!!!
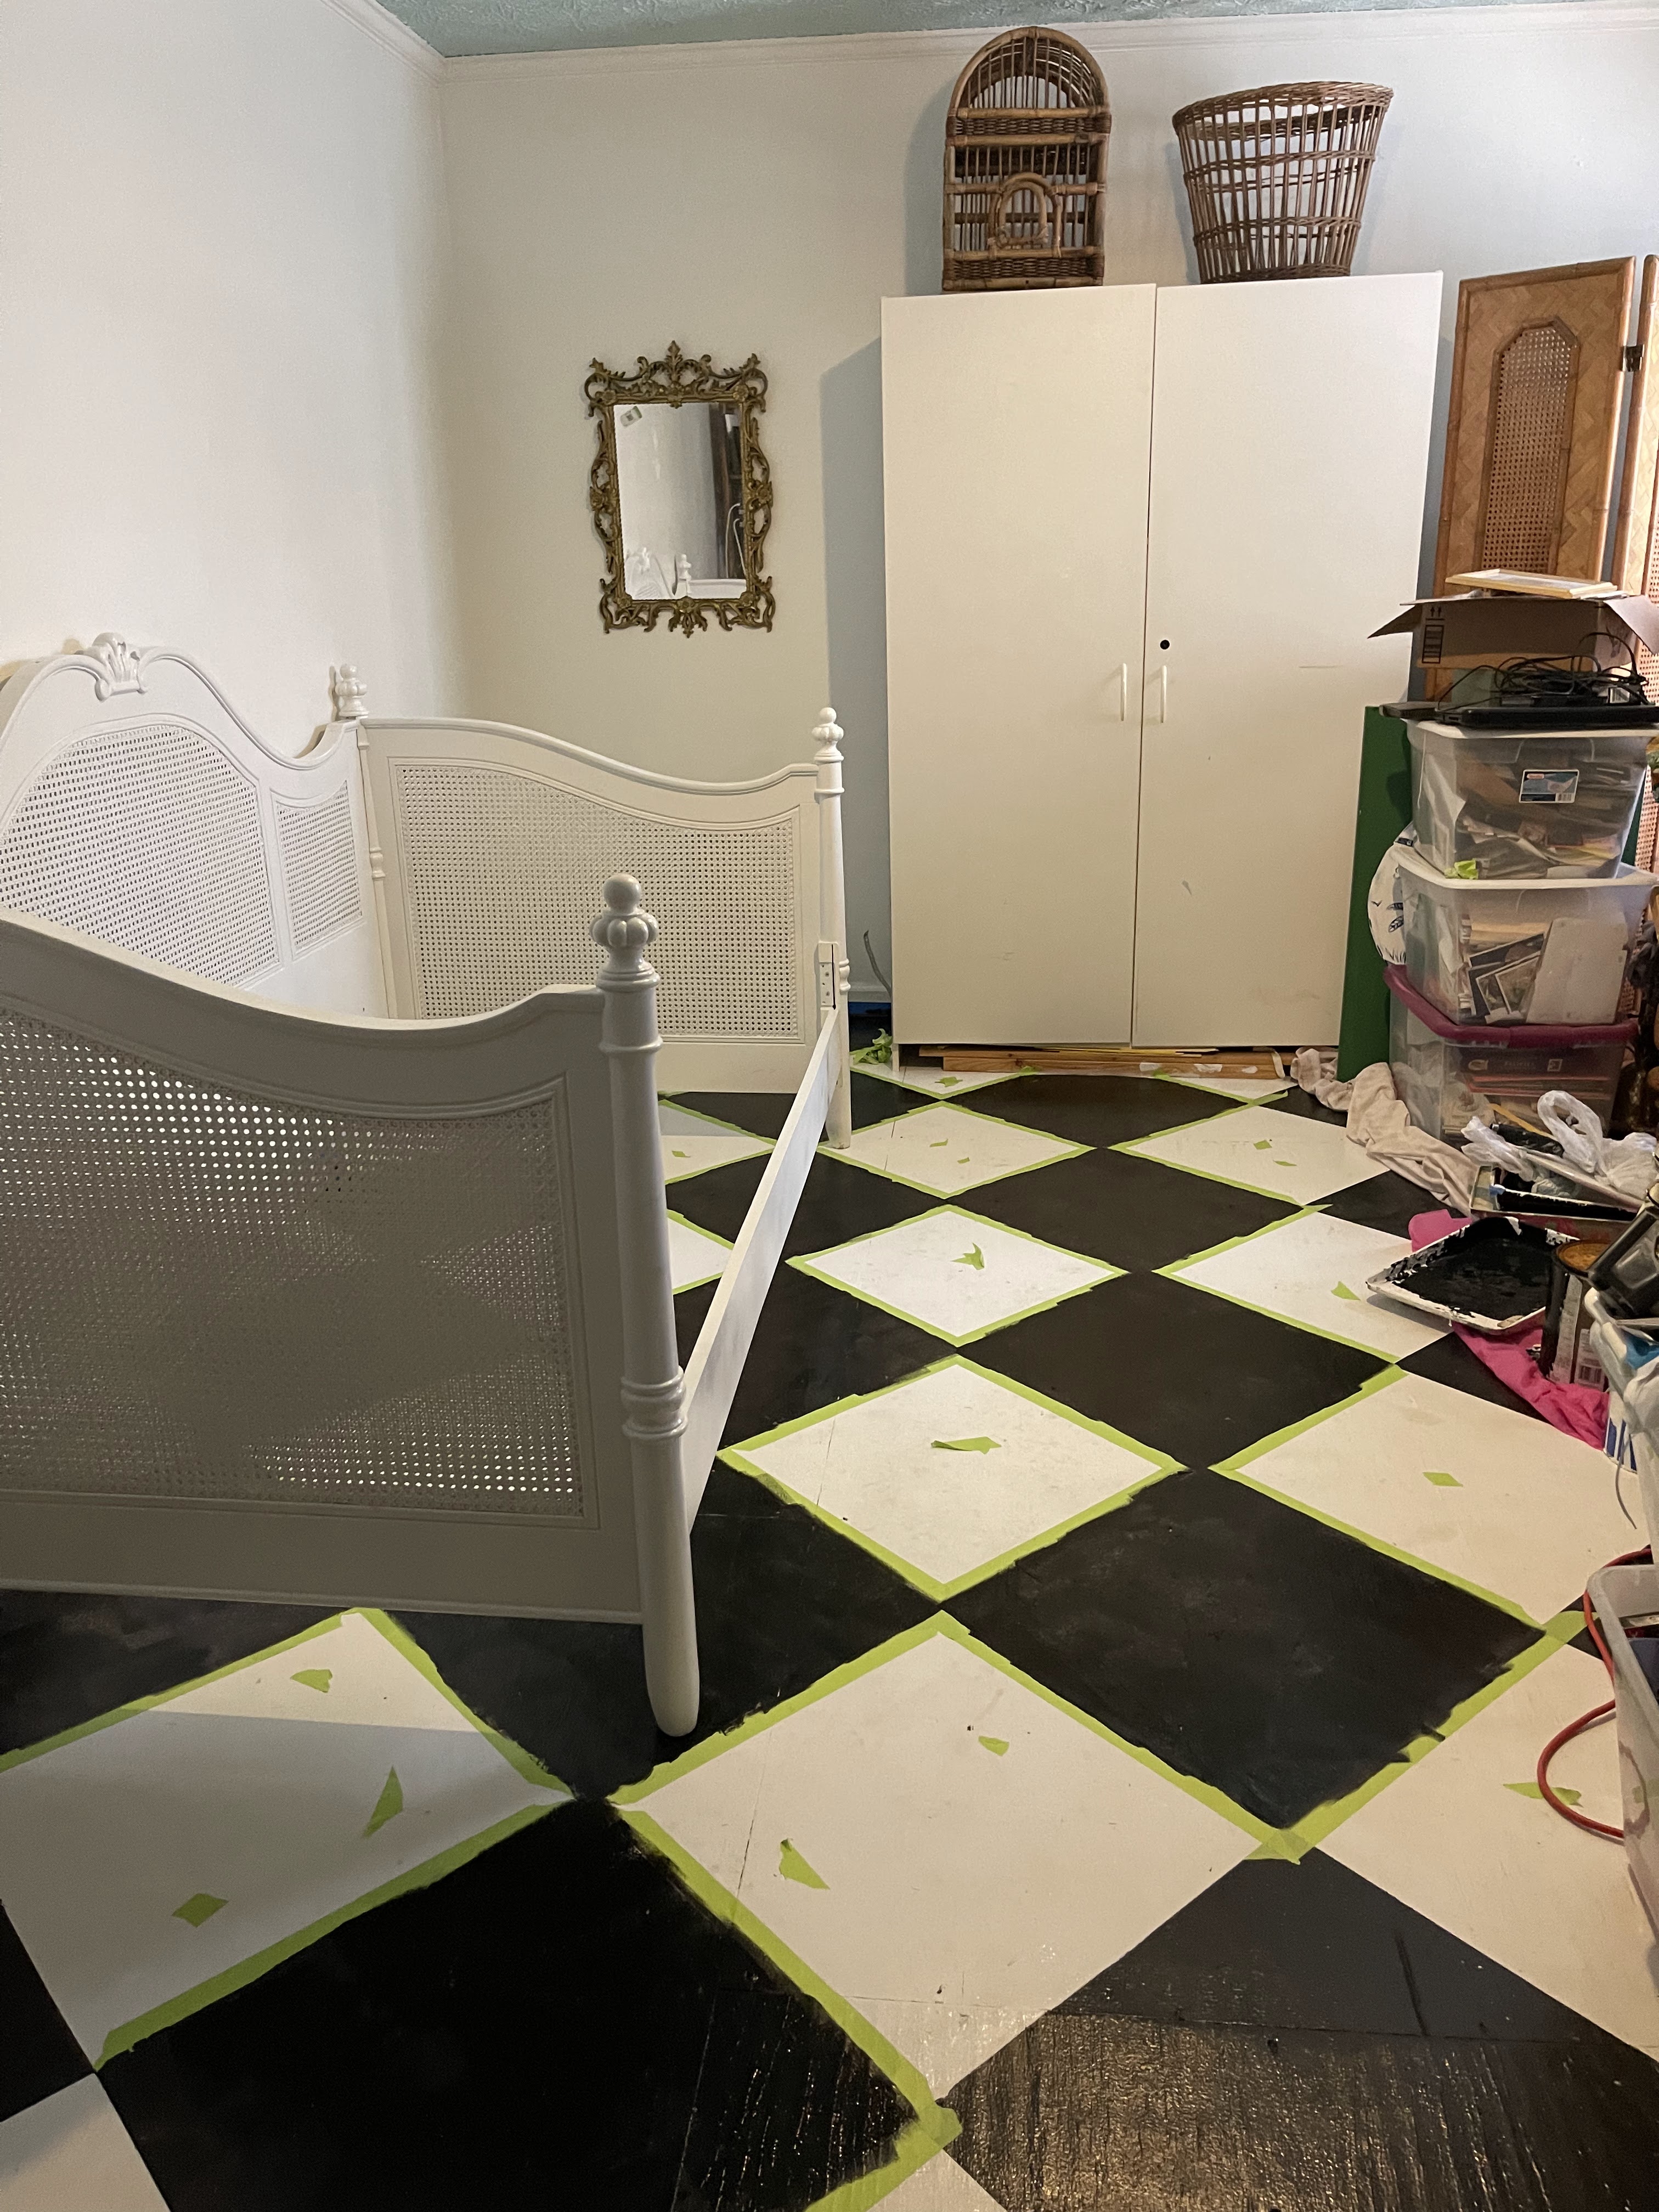
I love a black and white check floor, it fit the "sunroom" aesthetic I was aiming for and I had the paint on hand. Let the taping off begin!!
There was also a gallon of light blue paint sitting inside the doorway of the room
so I took it as a sign to paint the ceiling blue!
Already in the room as well - 2 bamboo shelves on each side of the French Doors. My plan is to gather up and/or thrift enough vintage wicker and rattan storage items to store the reduced amount of paint, ribbon and crafty supplies I do want to keep. And now that the doors will show from the inside the faux mirror overspray will have to be painted over. I'm thinking I might use an accent color instead of going with white. TBD.
This green shelf was also in this room before - on the opposite wall. I moved it over here because the daybed is going on the opposite wall. We had the opportunity about 40 years ago to take trim and a few other items from a 100 year old home in the Noonday area of our county that was slated to be demolished. This shelf is one of the items I saved. I love the hand cut scallops and I'm often amused when I read articles saying "scallops are the newest/latest design trend" or that they are "in" because this cute, scalloped shelf is over 100 years old.
#timeless
I had to purchase the bamboo blinds. We have bamboo blinds on all of the rest of our windows so it was past time to get them in here. I order them from Amazon and recently it has been difficult to find certain sizes in stock. I like to order these because I like the valance that covers the hooks at the top. I do have both kinds in the house and the difference isn't really that noticeable once the curtains are hung.
The daybed was an amazing GW find several years ago and was in a guest bedroom that I zhushed during a One Room Challenge. I wanted to give it a fresh coat of white paint. It had the original finish which was either off white or had yellowed slightly.
Unexpected, unforcasted rain caused us to move the bed inside while still not completely dry so it had to be set up in the room beforethe floors were finished so that it could dry without ruining the paint.
I found the mirror at GW several weeks ago for $1.99. I would like something a bit bigger with the same ornate look but for the price I grabbed it as a placeholder until the right one comes along.
I have a fun DIY planned for that big white cabinet on the back wall. It is just a storage cabinet from a big box store but it needs to stay. It holds a ton of stuff. I have this idea in my head and I'm excited to try it. Stay tuned.
I honestly thought I'd have a finished room and a "big" reveal by now but I'm excited about where this room is headed and the really slow, hard work like pulling up carpet and painting every surface is behind me. The prettier, more fun part is just ahead!


No comments:
Post a Comment