I'm having so much fun DIYing ornaments for my new King of Christmas Noble Fir. You can find the first DIY here.
If you've followed me on Instagram for any length of time then you know I have been on a marbleizing kick for a while. I marbleized some mini pumpkins last year and then marbleized all the pumpkins this year. I tried my hand at some Easter eggs last spring. I've had so many questions on IG about which technique I use so I decided Christmas ornaments would be next so I could show you how I marbleize.
Marbleizing Christmas ornaments is nothing new. I did this the first time a long, long time ago - I think it might have been a Martha Stewart craft years ago but there have been a lot of tutorials and methods around for ages. I'm going to share what works for me - I use spray paint. But you can also google it or check Pinterest and find a lot of methods and ideas to inspire you.You will need:
Spray paint. I use Rustoleum 2x (not sponsored but I wish they would send me a can of every color so I could go wild!) We do this outside on a plastic covered table.
Container for water. It will be covered in paint so use an old plastic container. It needs to be wide enough to get your item in with some space around it and deep enough that your item can be submerged without touching the bottom. Your water needs to be "room temp" not cold. Cold water will keep the paint from staying loose and smooth when you dip. Change your water in between colors and I think it helps to let the overspray on your container to dry before you spray a new color.
Plastic gloves and a spray paint mask if you choose.
Skewers to swirl the paint.
Ornaments. I think the marbleizing shows up best on white ornaments. You can use plastic or glass. You can find them at craft stores, Wal Mart, Target.
And you need a place for your ornaments to dry. I'll touch on that later.
Gather everything and get ready to get creative. This is not a precise process and every ornament turns out differently so just relax and experiment until you figure out what works for you.
Here's what you do:
Fill your container with water and choose your paint colors.
I tend to use one dark color plus white but you can use any combo you want. Experimenting is what makes this fun. You'll want to have plenty of blank ornaments on hand.
Next you quickly spray your colors onto the surface of the water. I alternate color, white, color when I spray. You may need to spray one of the colors an extra time. You'll get a feel for how much you need and also depending on how much coverage you want on your ornament.
Use the skewer to swirl the paints together lightly so that they look like marble.
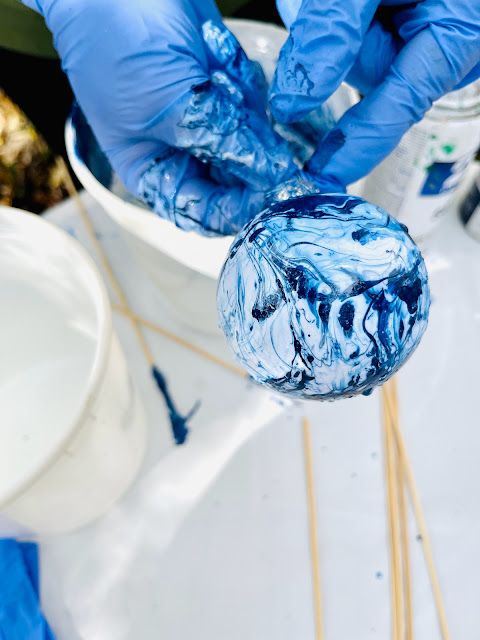
Now you want to dip your ornament slowly into the bucket of water and paint. I like to twirl my ornament slowly as I dip it to get a little more "swirl" and it helps to cover the ornaments surface. You can see a video of these ornaments being dipped here.
You can also place a dowel stick or skewer into the ornament and secure it with painters tape. I planned to paint my ornament caps gold so I didn't mind if they got a little paint on them. If you want to preserve your ornament caps then just remove them and set aside until your ornament is dry and use the tape and stick method.
If you use the method where your ornament is taped to the stick simply turn it upside down and place in a jar so the ornament can fully cure and the water droplets left on it will evaporate. If you use the method with the ornament cap left on you can simply use an ornament hanger to hang it up to dry. You can use a coat hanger to hang a few on but if you are like me and can't get stopped then string up a clothesline by your work table.

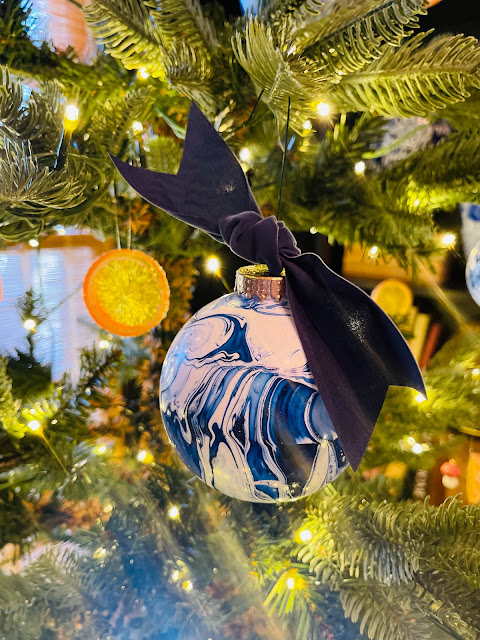
Once they have dried they are ready to enjoy. Add a ribbon and hang on the tree, pile in a bowl, use on top of a package, give them as neighbor gifts! Be sure to let me know if you create your own marbleized ornaments this year!
And be sure to check here on the blog and on IG because I have a couple more DIY ornaments to share. My new tree has the perfect shape for lots of ornaments!
Every ornament turns out a little different. This isn't a precise process. Relax and enjoy being creative.


No comments:
Post a Comment